 The test center offers the possibility to implement agent-based unit tests similar to
object-oriented unit tests (cf. the test framework JUnit).
In contrast to object-oriented tests in the Jadex framework the tested unit is not an object
but an agent. As agents can exhibit arbitrary complex reactive and proactive behaviour its
testing is far more difficult than it is in the object-oriented case. One reason for these
difficulties is that it is hard to set-up a defined start state which is always used to perform
the tests as agents can actively modify that state. Hence, the Jadex unit test framework
concentrates on the validation of inner-agent functionalities such as black-box testing
of functionalities from capabilities and other agents. Similar to the object-oriented testing also in Jadex
specific test agents (similar to test classes) can be implemented. Each test agent can perform
an arbitrary number of single test cases.
The test center offers the possibility to implement agent-based unit tests similar to
object-oriented unit tests (cf. the test framework JUnit).
In contrast to object-oriented tests in the Jadex framework the tested unit is not an object
but an agent. As agents can exhibit arbitrary complex reactive and proactive behaviour its
testing is far more difficult than it is in the object-oriented case. One reason for these
difficulties is that it is hard to set-up a defined start state which is always used to perform
the tests as agents can actively modify that state. Hence, the Jadex unit test framework
concentrates on the validation of inner-agent functionalities such as black-box testing
of functionalities from capabilities and other agents. Similar to the object-oriented testing also in Jadex
specific test agents (similar to test classes) can be implemented. Each test agent can perform
an arbitrary number of single test cases.
The graphical testcenter tool offers an easy to use interface that allows to run a bundle of testcases (called a test suite) and shows a green bar if all the testcases could be performed successfully and a red one otherwise, together with debug information.

The testcenter is subdivided into four panels (cf. Figure 8.1, “Test center overview”). The model tree on the left shows the agents of the project and highlights those that have been recognized as testable (that use the test capability). The "Test suite settings" panel contains a list of all test agents that belong to the current test suite. Below that panel the "Test suite execution" panel provides means for initiating resp. aborting the test suite execution and offers overview information about the current state of the execution. At the bottom the "Details" panel provides in-depth information about the results of the single tests.
Below a more detailed description of the panels and their usage is given.
 .
Each source folder that contains at least one testable agent changes its icon
to red and green
.
Each source folder that contains at least one testable agent changes its icon
to red and green
 and the packages that contain tests change the red and green icon to
 .
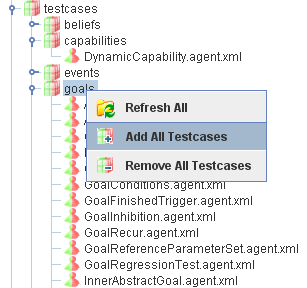
For adding resp. removing testable agents to/from the test suite different options are available:
.
For adding resp. removing testable agents to/from the test suite different options are available:
Adding a single test case can be done by double-clicking the testable agent.
Activating the popup menu on a single test case agent allows for adding
 or removing
 the selected test case.
Activating the popup menu on a test case folder allows for adding
 or removing
 recursively all contained test cases.
After having selected an agent or a folder adding
or removing
these items can also be done by using the corresponding buttons from the tool bar.
The test suite settings panel offers information about the current test suite.

All the testable agents of the test suite appear in the list. With the x-symbol you can remove testcases, with the "+"-symbol you can add new test suites and enter their name manually.
The checkbox below the list allows to turn on or off checking for duplicates. If duplicates are forbidden the addition of testcases that are already contained in the list will have no effect. Otherwise you can add the same testcase more than once.
The testcase timeout option allows for specifying the maximum amout of time that a single test agent is permitted to be executed. If the test agent does not return the test results within this timeframe it will be considered as failed. The default timeout for testcases is 20000 ms and can be adapted if necessary, i.e. if one of test agents needs a longer test execution time.
The testcase cuncurreny setting can be used to determine how many test agents should be executed at the same time. By setting the concurrency to 1 a sequential execution can be enforced. In general, the concurrent execution has several consequences. One important pragmatic aspect is that the execution will be much faster as the center can always execute some test and needs not to wait for the result of one specific test. On the contrary the parallel execution of tests also may lead to non-deterministic test results, if timeouts are used and the system load becomes too high. On the right hand side four buttons are offered. One for adding a testcase from the file system, two for loading and saving the test suite and one for clearing the current test suite.
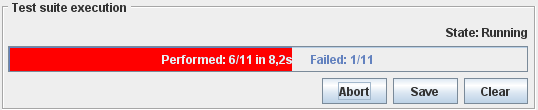
The test suite execution panel shows the test execution progress bar. This progress bar is green as long as all tests have been successfully executed. The first failed test causes the progress bar changing its color from green to red. Furthermore the progress bar contains overview information about the number of already executed tasks (performed: x/total), the time the exexcution took so far and the number of failed tests (failed: y/total).
The panel also offers three buttons, to run the test suite execution, save the test report and to clear the results of a previous test suite execution. The run button can be used to start the execution and changes to an abort button during execution. Pressing abort immediately stops the current execution. The save button can be used to store the detailed test result permanently in a file. The output file is saved in HTML and can hence be loaded by any browser. The clear button can be utilized to delete the contents of the details panel and additionally resets the progress bar.
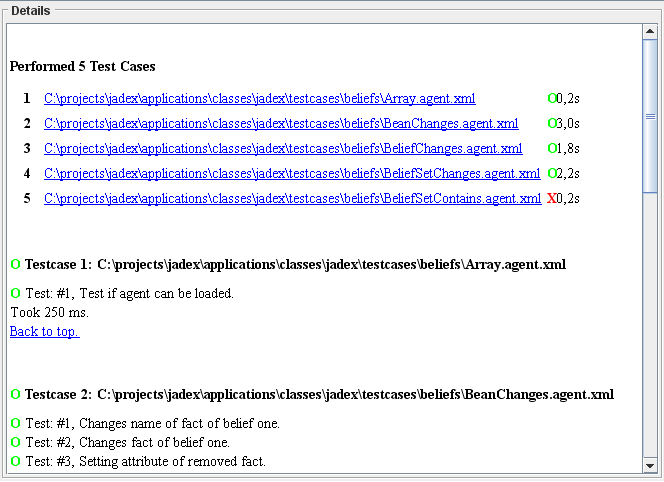
The details panel shows the detailed results of the testcase execution, including a detailed report about success and failure of the testcases (cf. Figure 8.5, “The details panel”).
The report begins with a test execution summary which lists all the test agents and shows the execution state. Tests that are currently in execution are marked as "?", whereas already failed tests are visualized with "X" and succeeded tests with "O". In addition the overview shows the execution time that was needed for each of the test agents.
Below the execution overview the detailed results are depicted. For each test agent a list of all the performed test cases is shown. Each test case report consists of the name, description and a result. In case of a testcase failure additionally a failure reason is displayed.
In this section it will be described how agent-based testcases can be written. The test agents can be executed either in the testcenter tool, or as they are normal agents in the starter tool. If you start them in the starter tool, the test output will be written to the console.
For the construction of a testable agent it is necessary to include (and make available)
functionality of the jadex.planlib.Test capability. In general,
this capability is responsible for collecting user-defined
jadex.planlib.TestReports and sends them back to the test center
after all tests of a test agents have been carried out. Conceretely, a test agent has
to import resp. reference the following elements of the Test capabiliy:
Reference the "reports" beliefset to which test reports have to be added.
Reference the "testcase_cnt" belief which determines the number of tests to perform in the test agent.
Reference the "timeout" belief which determines the timeout for the test agent. Within this deadline the test agent has to execute all declared tests and send back the results to the test center. The timeout is used as an agent argument (
exported="true") and will be set by the test center automatically when creating a test agent.Reference the "testcenter" belief which is needed for being able to send back the test results to the test center. The test center identifier is used as an agent argument (
exported="true") will be set by the test center automatically when creating a test agent. When no testcenter identifier is set, e.g. when starting a test agent manually, test results are automatically written to the console.
In the following a template ADF is depicted that shows exactly how the described elements need to be included:
...
<capabilities>
    <capability name="testcap" file="jadex.planlib.Test"/>
    ...
</capabilities>

<beliefs>
    <beliefsetref name="reports" class="TestReport">
        <concrete ref="testcap.reports"/>
    </beliefsetref>
    <beliefref name="testcase_cnt" class="int">
        <concrete ref="testcap.testcase_cnt"/>
    </beliefref>
    <beliefref name="timeout" class="long" exported="true">
        <concrete ref="testcap.timeout"/>
    </beliefref>
    <beliefref name="testcenter" class="jadex.adapter.fipa.AgentIdentifier" exported="true">
        <concrete ref="testcap.testcenter"/>
    </beliefref>
    ...
</beliefs>

<configurations>
    <configuration name="default">
        <beliefs>
            <initialbelief ref="testcase_cnt">
                <fact>...</fact> <!-- Here the actual number of testcases needs to be entered. -->
            </initialbelief>
        </beliefs>
        <plans>
            <initialplan ref="test"/>
        </plans>
    </configuration>
</configurations>
...
Figure 8.6. The ADF of a testable agent
Besides the test preparation the test cases have to be written in a plan which normally is defined also as initial plan of the test agent. In the following code snippet (Figure 8.7, “ The plan for a testable agent ”) it is depicted what steps usually make up one test case.
...
public void body()
{
    ...
    TestReport tr = new TestReport("#1", "The description of what is tested.");

    try
    {
        // Test code goes here, e.g.:
        // IGoal mygoal = createGoal("my_goal");
        // dispatchSubgoalAndWait(mygoal);
        tr.setSucceeded(true);
    }
    catch(GoalFailureException e)
    {
        tr.setFailed("Exception occurred: " + e);
    }
    getBeliefbase().getBeliefSet("reports").addFact(tr);
}
...
Figure 8.7. The plan for a testable agent
The test plan should take care of creating a test report (jadex.planlib.TestReport)
before the actual test code and initialize it with a name (e.g. the number of the test) and
a short description of what is to be tested (both appear in the test report details).
Below that setup code the domain dependent test code can be placed. Usually, it is advantageous surrounding that test code with a try-catch block so that any occurring exception can be handled and the plan is capable of continuing with the execution of futher test cases from the same plan.
If the execution of the test was successful (e.g. when no exception occurred and the
results are as expected), this should be marked in the test report via the
setSucceeded(true) method.
In case of a failure, the setFailed()-method can be used.
It requires an error description to be given as parameter.
The test case execution is finished by adding the corresponding test report to the
“reports”-beliefset (see Figure 8.6, “
The ADF of a testable agent
”) by calling
getBeliefbase().getBeliefSet("reports").addFact(tr);.
The test agent won't terminate successfully until the last report is added to
the “reports”-beliefset.
If you want to do any cleanup operations before terminating, this should be done before adding the last test report to the “reports”-beliefset. The reason is that the Test capability will immediately notice when the declared number of test cases has been executed and will subsequently send back the test results to the test center and terminate the test agent.