 The conversation center can be used to compose messages,
send messages to agents and inspect the received answers.
The left part of the panel (see Figure 5.1, “Conversation center overview”)
contains two lists for the latest sent and received messages. Double
clicking on a message from one of the lists will show the message
contents as a new tab on the right side.
The conversation center can be used to compose messages,
send messages to agents and inspect the received answers.
The left part of the panel (see Figure 5.1, “Conversation center overview”)
contains two lists for the latest sent and received messages. Double
clicking on a message from one of the lists will show the message
contents as a new tab on the right side.
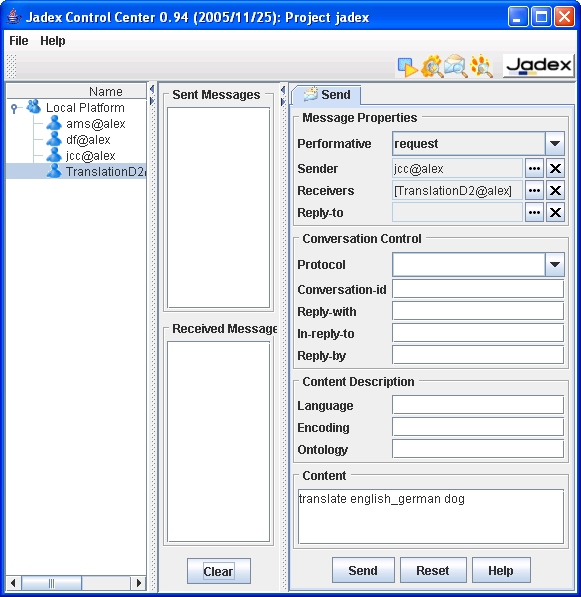
The send tab will always be present and allows to compose a new message for sending. The message format follows the FIPA standards (see http://www.fipa.org). You can choose an appropriate performative for your message by using the drop down list of available performatives. The sender is by default initialized with the name of the control center agent. The receivers specify which agents will receive the message. If answers to the message should not be sent to the original sender (default) you can provide an optional reply-to agent. The agent identifiers for sender, receivers, and reply-to are selected using a separate dialog, which can be accessed by clicking the "..." button besides the text field. To clear the agent identifiers click on the "x" button to the right of the "..." button.
The other attributes of the message can be entered as plain strings. For the protocol you can also select one of the protocol types predefined by FIPA. Normally, only a few slots need to be filled in for a message. See e.g. Figure 5.1, “Conversation center overview”, which shows a message commonly used in the [Jadex Tutorial]. After composing the message it can be sent simply by hitting the "Send" button. If it was successfully sent, a copy of the message will be placed in the sent messages list.
You can later reopen the message in a new tab by double-clicking it in the list. To resend the message without changes click the "Send again" button in the newly opened tab. If you wish to change the message before resending it use the "Edit" button instead, which will fill in the slots of the message in the send tab, so you can edit it.
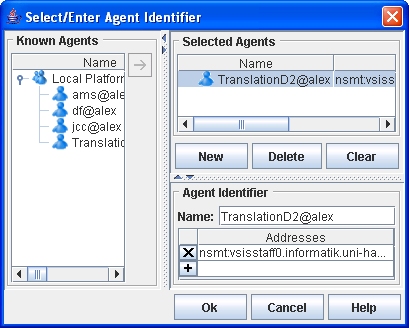
The left list of the agent selector dialog (see Figure 5.2, “Agent selector dialog”) shows the agents currently running on the platform. You can double-click on an agent from the list to select it. The upper list on the right side shows the currently selected agent(s). The buttons below the list allow to add a new agent identifier from scratch, which can be edited below the list. When you finished selecting agents, hit the "Ok" (or "Cancel") button at the bottom of the dialog.
The messages received by the conversation center agent are placed in the received messages list. Double-clicking on a received message will open it as a new tab (see Figure 5.3, “A received message”). When you want to reply to the message, click on the "Reply" button. The user interface will switch to the send panel, and fill in all slots (receiver, conversation-id, etc.) based on the received message. You can then edit the reply message and hit the "Send" button. If you want to get rid of the tab of a received message, you can use the "Close" button next to the "Reply" button.
