Setting up the Jadex environment properly is pretty easy and can be done in a few simple steps. Generally, Jadex is realized as reasoning engine meaning that it can be used on top of different (agent) middlewares. In this tutorial we will use the Standalone version of Jadex. The Jadex distribution should be extracted to some local directory, called JADEX_HOME here.
Set the Java CLASSPATH variable properly by adding the following jars:
The actual filenames of the jar files may differ slightly due to versioning conventions.
Necessary libraries for the Jadex kernel:
JADEX_HOME/lib/jadex_rt.jar
JADEX_HOME/lib/jibx-run.jar
JADEX_HOME/lib/xpp3.jar
JADEX_HOME/lib/nuggets.jar
JADEX_HOME/lib/janino.jar
Necessary libraries for the Jadex Standalone platform:
JADEX_HOME/lib/jadex_standalone.jar
Necessary libraries for the Jadex tools:
JADEX_HOME/lib/jadex_tools.jar
JADEX_HOME/lib/GraphLayout.jar
JADEX_HOME/lib/jhall.jar
The command for launching the Jadex Standalone platform is:
java [conf=<platform.properties>] jadex.adapter.standalone.Platform
If the configuration file is not specified, the default configuration (jadex.properties)
will be read from the root directory of the jadex_standalone.jar.
Create a simple Jadex agent.
Open a source code editor or an IDE of your choice and create a new agent definition file (ADF)
called TranslationA1.agent.xml (cf. Figure 2.1, “A1 XML ADF”).
We recommend using eclipse with web-tools plug-in for editing ADFs or some other advanced
XML-Editor such as the commercial application Altova XMSpy.
In this file all important agent startup properties are defined in a way that complies to the
Jadex schema specification. First property of the agent is its type name which must be the same as the
file name (similar to Java class files), in this case it is set to TranslationA1.
Additionally you can specify a package attribute, which has a similar meaning as in Java
programs and serves for grouping purposes only (you will need to alter the package name
with respect to your actually used directory structure). All plans and other Java classes
from the agent's package are automatically known and need not to be imported via an import tag.
  1 <!--
  2     TranslationAgent
  3 -->
  4 <agent xmlns="http://jadex.sourceforge.net/jadex"
  5     xmlns:xsi="http://www.w3.org/2001/XMLSchema-instance"
  6     xsi:schemaLocation="http://jadex.sourceforge.net/jadex
  7                         http://jadex.sourceforge.net/jadex-0.96.xsd"
  8     name="TranslationA1"
  9     package="jadex.tutorial">
 10 </agent>
Figure 2.1. A1 XML ADF
Start your first Jadex agent. Start the Jadex platform with the command explained above. After some short time the Jadex Control Center should show up with its user interface. Within the "Start Agents" panel browse the directories and select your TranslationA1.agent.xml. The effect of choosing the input file is, that the agent model is loaded. When it contains no errors, the description of the model, taken from the XML comment above the agent tag, is shown in the description view. In case there are errors in the model, correct the errors shown in the description view and press “reload”. Below the file name, the agent name and its default configuration are shown. After pressing the start button the new agent should appear in the agent tree. It is also possible to start an agent simply by double-clicking it in the model tree or by activating the popup menu in the tree on an agent model and the select the start option. Curiously, you can start a second JCC by choosing it from: jadex/tools/jcc/JCC.agent.xml and giving it a name like JCC2.
The JCC provides a project management facility that simplifies working on specific applications. Basically, a project contains settings about the used project folders as well as miscellaneous tool and user interface settings. All your settings - as window settings, added paths and so on - will be stored in a .prj-file and additional properties-files will be created automatically to store the individual settings for the plugins you are using. In order to avoid making all the settings in the JCC on every startup in this exercise it will be shown in this exercise how a project is set-up.
To create a project you have to choose “New Project” in the “File”-menu of the JCC. For saving the project on disk select “Save Project As...” from the “File”-menu. In the appearing file requester, please choose an arbitrary name for your project and choose the folder in which the project files shall be saved.
Whenever you choose “Save Project” from the “File”-menu the current settings will be saved to disk. Additionally, the settings are also saved automatically when shutting down the JCC via its window close button or “Exit” from the “File”-menu.
You can also use multiple projects with different settings. To switch projects simply click on “Open Project” in the “File”-menu and choose the project you want to work with.
Verify project behaviour. In order to verify that you project has been set up correctly you should perform some visible changes such as changing the JCC's window size or switching to another plugin than the starter. After that you should shut down the JCC and platform and restart it. If the project has been created correctly, the JCC will show up in exactly the same state you left it, i.e. the last active plugin will be activated and the gui settings are remembered, too.
The Jadex distribution already contains a couple of examples. The objective of this
exercise consists in trying out the examples and also in roughly understanding their
application purpose. Open the JCC and select the starter view as described in exercise A1
and click on the button
 to add a new path or jar to the project. A file chooser window will open and
you should choose the jadex_examples.jar from your “JADEX_HOME/lib”-folder.
Please note that you should not add arbitrary paths to your project as these paths
are added to the project specific classpath. Instead, only the root directories of
Java packages (such as a "classes" or "build") should be added to the project.
to add a new path or jar to the project. A file chooser window will open and
you should choose the jadex_examples.jar from your “JADEX_HOME/lib”-folder.
Please note that you should not add arbitrary paths to your project as these paths
are added to the project specific classpath. Instead, only the root directories of
Java packages (such as a "classes" or "build") should be added to the project.
The content of the new jar will be added as new node to the model tree.
At the bottom you can now see this jar-file beeing scanned (is the scanning option
has not been disabled). Next, you can expand the model tree by double clicking on
the corresponding node
 , which represents the jar-file. After openening the folders
“jadex” and “examples” you will see the different
example folders containing several different kinds of single- and multi-agent
applications. Concretely the following applications are available:
, which represents the jar-file. After openening the folders
“jadex” and “examples” you will see the different
example folders containing several different kinds of single- and multi-agent
applications. Concretely the following applications are available:
Blackjack.
 A distributed Blackjack implementation that allows agents as well
as human players playing the famous Blackjack card game. In each
round the participants bet virtual money and are rewarded if they
win against the dealer.
A distributed Blackjack implementation that allows agents as well
as human players playing the famous Blackjack card game. In each
round the participants bet virtual money and are rewarded if they
win against the dealer.
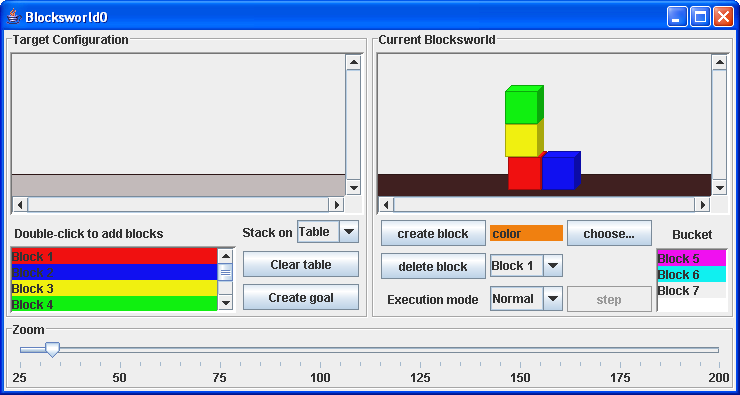
Blocksworld.
 In the well-known blocksworld scenario the problem consists of
stacking differently colored blocks on a table. The objective for
the agent is here to restack the blocks (and block towers) on the
table in a way that the target configuration is achieved. This
target configuration can be entered via the gui by the human user.
In the well-known blocksworld scenario the problem consists of
stacking differently colored blocks on a table. The objective for
the agent is here to restack the blocks (and block towers) on the
table in a way that the target configuration is achieved. This
target configuration can be entered via the gui by the human user.
Booktrading.
 In the booktrading scenario human book buyers and sellers delegate
buy resp. sell orders to their corresponding agents. The agents
negotiate using a contract-net protocol at a distributed market
place in order to fulfill the strategic goals of their
principals (low/high prices, deadline etc.).
In the booktrading scenario human book buyers and sellers delegate
buy resp. sell orders to their corresponding agents. The agents
negotiate using a contract-net protocol at a distributed market
place in order to fulfill the strategic goals of their
principals (low/high prices, deadline etc.).
Cleanerworld.
 The cleanerworld example deals with the exploring and cleaning
of an unknown environment. Basically, a cleaner robot has the tasks
to search for waste, pick it up and bring it to a nearby wastebin.
Additionally, it has to patrol in the environment at night and
must always ensure that its battery does not run low.
The cleanerworld example deals with the exploring and cleaning
of an unknown environment. Basically, a cleaner robot has the tasks
to search for waste, pick it up and bring it to a nearby wastebin.
Additionally, it has to patrol in the environment at night and
must always ensure that its battery does not run low.
Garbagecollector.
 This example is a simpler version of the cleaner world. Cleaner
robots have a predefined route which the use for picking up waste.
When they found a piece of waste they carry it to a burner agent
nearby which is responsible for burning it.
This example is a simpler version of the cleaner world. Cleaner
robots have a predefined route which the use for picking up waste.
When they found a piece of waste they carry it to a burner agent
nearby which is responsible for burning it.
Helloworld. The helloworld example contains a simple agent that when started prints out some welcome message and terminates itself after that.
Hunterprey.
 This is a quite complex multi-agent simulation which realizes a
variant of the hunter prey scenario. In general there are two
different kinds of animals sheeps (the preys) and wulfs (the hunters).
Both animals can get points by comsuming food. A sheep looks for
salad whereas the wolfs hunt sheeps.
This is a quite complex multi-agent simulation which realizes a
variant of the hunter prey scenario. In general there are two
different kinds of animals sheeps (the preys) and wulfs (the hunters).
Both animals can get points by comsuming food. A sheep looks for
salad whereas the wolfs hunt sheeps.
Marsworld.
 In this scenario three different kind of robots operate on mars
and search for ore. The main strategic objective is to carry as much
ore as possible to the homebase of the robots. For this purpose
sentry robots scan promising locations and commission production
robots. These production robots convey the ore and order carry
robots which have the task to bring the ore to the homebase.
In this scenario three different kind of robots operate on mars
and search for ore. The main strategic objective is to carry as much
ore as possible to the homebase of the robots. For this purpose
sentry robots scan promising locations and commission production
robots. These production robots convey the ore and order carry
robots which have the task to bring the ore to the homebase.
Ping. The ping example shows how an agent can send a simple "ping"-message to another agent which reacts on this message with an "alive"-reply.
Puzzle.
 The puzzle agent has the task to solve a complex board game. The
main goal is to swap the positions of the red and white pegs
whereby the pieces can only move forward one field and can jump
over one opposite peg. The puzzle agent solves this game by
using an goal-oriented form of backtracking.
The puzzle agent has the task to solve a complex board game. The
main goal is to swap the positions of the red and white pegs
whereby the pieces can only move forward one field and can jump
over one opposite peg. The puzzle agent solves this game by
using an goal-oriented form of backtracking.
Starting an example can in most cases be done by opening the corresponding folder and searching for a so called "manager" agent. Such managers have the purpose to start-up all relevant application agents. In case there is no manager agent the example is so simply that it can be started by executing the contained application agent(s) directly (e.g. in the puzzle example you can directly start Sokrates). To start an agent you have to activate the starter perspective and double click on the agent in the model tree or click once and use the start button at the right hand side.
If you double click e.g. on the “Blocksworld.agent.xml” the blocksworld example will be started and you should see the following gui:
In the same way you can add other paths and execute your own agents later. In this case you will not add jar-files, but the root directory of your packages.
Explain example behaviour. Choose one of the more complex examples for a more detailed analysis. Select the manager agent of the example and read through its documentation shown in the starter panel. Then look into the selected example directory and read also the documentation of the other application agents which belong to that manager. Finally, open the source code of these agents (*.agent.xml) in your source code editor and try to grasp roughly of what they are comprised. Write down a (simple!) explanation how the multi-agent system and the involved agents work.