The Beanynizer is a plugin for the widely used ontology development environment Protégé™ and allows to generate JavaBeans and a JADE™ ontology file from a modelled ontology. It is very similar to the well known beangenerator plugin™ by Acklin but offers some more flexibility regarding the generated code.
The description of the installation process assumes that you have successfully
downloaded and installed Protégé™ 2.1 (or later). The
installation of the plugin is simple. Extract the plugin.zip
file from the beanynizer distribution into the
protege/plugins directory. Make sure to use the “Use
folder names” option (or similar) of your zip tool, such that a
subdirectory protege/plugins/jadex.tools.beanynizer is
automatically created. (You can also create this directory by hand before unzipping. In
the end you should have a jadex_beanynizer.jar, a plugin.properties file,
and some additional jar files in this directory.) Now you can start
Protégé™ as usual. The → menu should contain an entry .
Selecting this entry will just take you to the Jadex homepage. For the usage of the
plugin see the next sections.
This section only discusses details of the usage of the Beanynizer plugin. For general information about creating ontologies in Protégé™ please consult the Protégé™ documentation. To create an ontology for use with Jadex, follow these four steps:
Create a new ontology e.g. with the → menu item. Note that Beanynizer currently does not support OWL, so you have to choose a standard or RDF ontology format. Save the new ontology to a directory of your choice.
Include one of the Beanynizer default ontologies. The beanynizer supports the creation of ontologies for use with the JADE platform (
beanynizer_default.pprj), or pure Java ontologies for use with the Jadex Java-XML encoding (beanynizer_beans_default.pprjorbeanynizer_beans_fipa_default.pprjif you want to refer to FIPA related concepts). E.g., Use the → menu and select thebeanynizer_beans_fipa_default.pprjfile in the appearing file chooser. Protégé™ will store the location of the default ontology using an absolute path. As this is undesirable most of the time, you should copy the Beanynizer default files (.pprj,.pins,.pont) to the directory of your ontology, and include the ontology from there. In this case Protégé™ will use a relative path name.Add classes and slots to your ontology. The JADE default ontology provides four base classes (
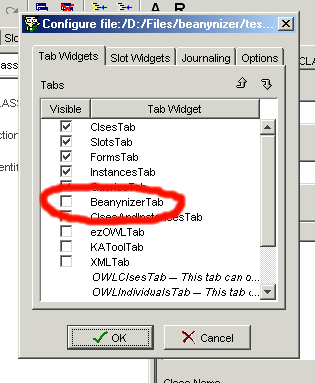
Concept,AgentAction,agent-identifier,Predicate) that you should use as superclasses for your own concepts. If you don't know the meaning of thesebase classes consult the JADE™ ontology guide. The for a pure Java ontology, classes can be directly created as subclasses of Protégé's :THING class. In any case, you may also find it helpful to take a look at the ontologies used in the Jadex examples.Generate Java sources from the ontology using the Beanynizer tab. If you created your ontology from scratch, you will have to activate the tab first. Select the → menu and open the Tab Widgets tab (see Figure 7.1, “Protégé™ plugin configuration”). Activate the Beanynizer tab and close the dialog by hitting . In the Beanynizer Tab you can now edit the code generation options such as packagename and output directory (see Figure 7.2, “Jadex Beanynizer tab”). Depending on the base ontology you used, you also have to select the correct Generation Mode (Java for a pure beans ontology, Jade for a JADE ontology). Pressing the button will create the desired source files. See the Jadex user guide, for an introduction how to use the generated ontology in your Jadex agents. The next sections discuss how you can influence the code generationprocess.
The general options for the ontology are available from the code generation panel (see
Figure 7.2, “Jadex Beanynizer tab”). The ontology name is the
name, that will appear in the ontology slot of an ACL messages.
From Java this is available with the
ontologyclass.ONTOLOGY_NAME
constant. A package can be specified, where the ontology class file should be generated.
This package is also the default for other generated classes. The class name is the
Javaclass name to be used for the ontology (without package). The output directory is
the root directory for the package hierarchy to be generated. You can use relative paths
here, which will be expanded relative to the saving-location of the
Protégé™ project. When subdirectories for some packages do not
exist, they will be created on-the-fly.
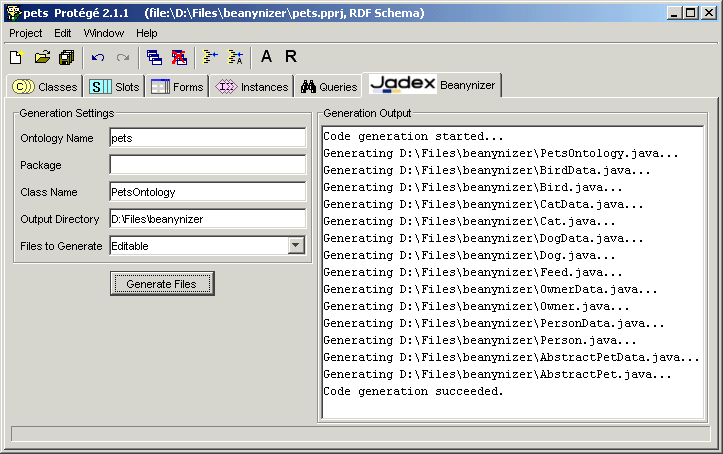
The Files to Generate option specifies which kind of Java files should be generated for your ontology classes. Note that this option only represents a default, that can be overridden individually for each ontology class as described in the next section.
- External
means that the ontology uses Java classes that already exist and do not have to be generated. In this case, only the single ontology class file will be generated.
- Editable
(which is the default) creates two files for any ontologyclass: A
classnameData.javaclassname.java- Fixed
option only creates one file for each ontology class. This file should not be edited, because changes are lost, when regenerating code.
The Protégé™ classes panel is extended with extra options concerning the code generation. These extra options are shown below the template slots list (see Figure 7.3, “Protégé™ classes panel”, bottom right). As default, the Protégé™ name of the class is used for the .java file. This can be overridden by specifying an additional Java class name. The interface flag can be set, when not a class but an interface should be generated. In general, this only makes sense for abstract ontology classes.
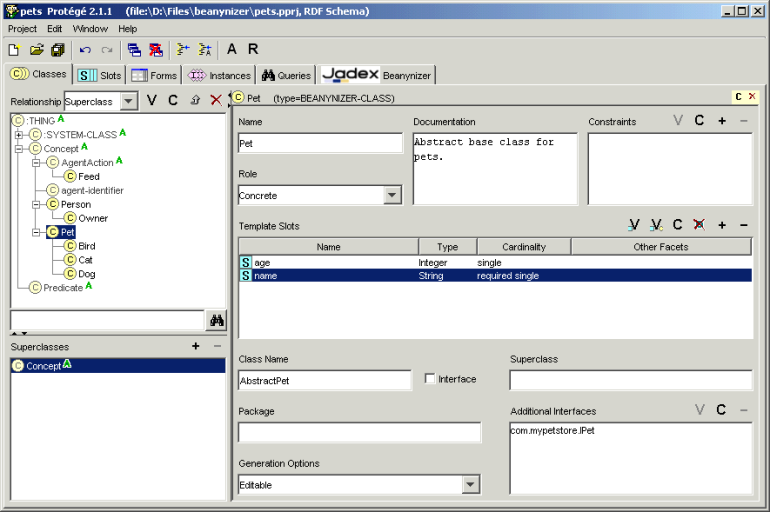
The package field allows to specify the package of the Java class, overriding the
default package specified in the code generation tab. The Generation
Options offer the same options as the Files to Genrate,
and influence how many files are generated for each ontology class. E.g., setting the
option to Fixed allows to include an already existing class in the
ontology. In addition, the field can be left blank to indicate that the ontology default
should be used. The superclass field and the additional interfaces list, allow to
specify fully qualified class or interface names to use as superclass or additionally
implemented interfaces. If no superclass is given, the code generator creates a class
hierarchy corresponding to the hierarchy in the ontology. For interfaces, only
implements is added to the
class, the generator does not (yet) magically fill in any missing method
implementations.interface, . . .
The code generator generates fields and getter / setter methods for each slot, thereby respecting settings such as name, type, default value, and cardinality (see Figure 7.4, “Protégé™ Slot Options”). For slots that allow multiple values, also add / remove methods are generated. Supported slot types and their default Java mappings are:
Table 7.1. Slot to Java type mappings
| Slot Type | Java Type |
|---|---|
| Any | n/a |
| Boolean |
boolean
|
| Class | n/a |
| Float |
double
|
| Instance | a java class |
| Integer |
int
|
| String |
java.lang.String
|
| Symbol |
java.lang.String
|
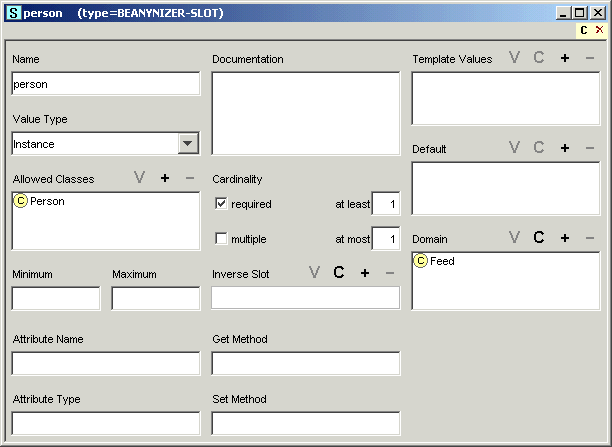
The name to use for the generated field can be specified using the attribute name
option. The Beanynizer has its own idea of Java coding conventions and tries to create a
suitable Java name from the slot name, when no specific attribute name is given. The
attribute type allows to change the generated Java type, by specifying a fully qualified
class name, or one of the basic types (e.g. long). The names of getter and setter
methods are derived from the attribute name (which may also be derived from the slot
name). Use the get method and set method options to change the names of the methods to
generate. This is especially helpful, when including already existing classes in the
ontology.
The pure Java ontology supports two other settings for slots: transient and external.
For transient slots, the field is generated with the transient keyword.
External slots are ignored during code generation (this is useful, if the ontology class extends an
existing Java class, which already provides the get/set methods for a given slot).
It is possible (while maybe a bit awkward) to convert other ontologies to be used with the Beanynizer. To convert an existing ontology perform the following steps (note, this process has only been tested with Protégé 2.1 and might not work with 3.0):
Load the old ontology and save it under a new name (to keep the original file untouched).
Use the → option to remove references to other external ontologies.
Include the Beanynizer default ontology as described above. If your original ontology was also designed for use with a FIPA-compliant agent platform, ignore any errors, e.g., complaining about duplicate definition of classes like
AgentAction, etc.If your original ontology did contain FIPA classes with different names (e.g.,
AIDfor agent identifiers) change all references to these classes (if any) to now refer to the Beanynizer classes (e.g.,agent-identifier). Afterwards remove the original FIPA classes.When your original ontology was not designed to be used with FIPA, you might have to rearrange the class hierarchy, such that all your classes are derived from the appropriate classes (such as AgentAction).
Now the awkward part: Make sure that all your classes and slots are instances of the Beanynizer metaclasses. The required metaclass is called
BEANYNIZER-CLASSand is a subclass of the:STANDARD-CLASS. You change the metaclass by selecting each single class and using the option from the popup menu, but a much faster way is to change to the instance tab, and use drag and drop. The same procedure should be done for your slots, which should be instances of theBEANYNIZER-SLOT. Finally, you should make the Beanynizer class and the Beanynizer slot the default metaclasses by using the option from the popup menu.You're done! You can now start to generate code, or to adjust code generation options as described above.
Protégé™ is a complex tool in itself, therefore a basic understanding of it is essential before you can effectively use the Beanynizer plugin. The Beanynizer is an early staged recent development based on our specific requirements, and does not try to be a general purpose code generation environment. If you encounter problems or miss some features please drop us a note, such that we can improve the Beanynizer for upcoming releases.
Usages of the Beanynizer can be found in the cleanerworld, marsworld and hunterprey
examples (look for an "ontology "package). Also, some Jadex tools use a Beanynizer
generated ontology for communication (e.g., logger, introspector, and tracer). Their
Protégé™ ontology files can be found in the
jadex/onto directory.
The Beanynizer was designed for flexible code generation. The code for the Java
classes is based on templates processed with the Velocity template engine. The
templates for the Java and Jade generation modes can be found in the src/jadex/tools/beanynizer/genjava and
src/jadex/tools/beanynizer/genjade directories.
If you want to change the way Beanynizer generates code, you may try to alter these
templates to suit your needs. See http://jakarta.apache.org/velocity/ for more information about the Velocity
template language.