Release 0.96
If you have support questions about Jadex please use the sourceforge help forum and mailing list for that purpose (available at http://sourceforge.net/projects/jadex/).
Table of Contents
Jadex includes various tools for runtime and debugging activities as well as for development and documentation purposes. There are also some legacy tools developed with Jadex for the JADE platform.
Jadex Runtime Tools.
Chapter 2, Jadex Control Center. The Control Center is the central access point for all runtime tools. It offers functionalities provided by plug-ins in separate perspectives.
Chapter 3, Jadex Starter. The Starter plug-in offers a user-interface to administer the agents on the platform. It can be used to load, start and kill selected agents.
Chapter 4, DF Browser. The DF (Directory Facilitator) Browser plug-in offers a user-interface to administer the service registrations on the platform. It can be used to view and remove agent/service descriptions.
Chapter 5, Conversation Center. The Conversation Center can be used to compose messages in a user interface and send them to agents directly.
Chapter 6, Introspector. The Introspector plug-in can be used to observe the internal state of agents including their beliefs, goals and plans. It also includes a debugger that allows to execute agents stepwise.
Chapter 7, BDI Tracer. The Tracer plug-in may be used to visualize the internal processes of an agent at runtime and show causal dependencies among agent's beliefs, goal, and plans.
Chapter 8, Test Center. The Test Center can be used to assemble a test suite consisting of a number of test cases. In the test center the test suite can be executed and the results are made available as report.
Chapter 9, Jadexdoc Tool. The documentation tool helps to create JavaDoc-like documentation for Jadex agents.
Appendix A, JADE RMA Plugin. The Remote Monitoring Agent (RMA)-Plugin makes available the functionality of the JADE RMA in the context of the JCC. The RMA basically facilitates the access to the JADE-specific runtime tools like e.g. the message sniffer. (only available if running Jadex on top of the JADE adapter).
Jadex Development Tools.
Chapter 10, Beanynizer. The Protégé plugin is handy with creating ontologies and converting them to Java bean classes.
The Jadex Control Center (JCC) represents the main access point for all available Jadex runtime tools. The JCC itself provides its functionalities via plugins and is therefore quite easily extensible. Currently the following plugins are shipped with the standard distribution of Jadex: Starter, DF Browser, Conversation Center, Introspector, Tracer, Test Center and Jadexdoc. Each tool provides its own perspective in the JCC and is described in subsequent chapters.
Main aspect of the JCC is the project handling. A project is used to store user
settings made in the JCC itself (like window sizes or user settings) and the settings
from the various plugins. Project files consist of a main project file (ending ".jpr"
for Jadex project) and additional property files for each plugin.
In addition, the JCC uses a startup configuration, taken from the configuration under
the key jcc.plugins which is will be taken from the path specified
in the startup argument (-conf in Standalone resp. -Dconf= when using JADE).
If the platform has been started without the conf option Jadex will search first
in the current start directory for jadex.properties and if there are no properties
available the properties will be loaded from the jar file (e.g. from
jadex_standalone.jar in case of the standalone platform).
In addition to the plugin list the configuration also contains a
pointer to the last project the user worked with (jcc.project).
At the launch time of JCC the last project will be automatically reopened.
Note
The Control Center is realized as Jadex agent
jadex/tools/jcc/JCC.agent.xml and is started per default
when the Standalone platform is launched. To prevent the Control Center being
started the -nogui option can be used for the Standalone
platform. Using other adapters the Control Center can be launched by simply starting
the corresponding JCC agent mentioned above.
The Jadex Control Center provides different graphical areas that are partly customized by some of the plugins. Basically the JCC offers:
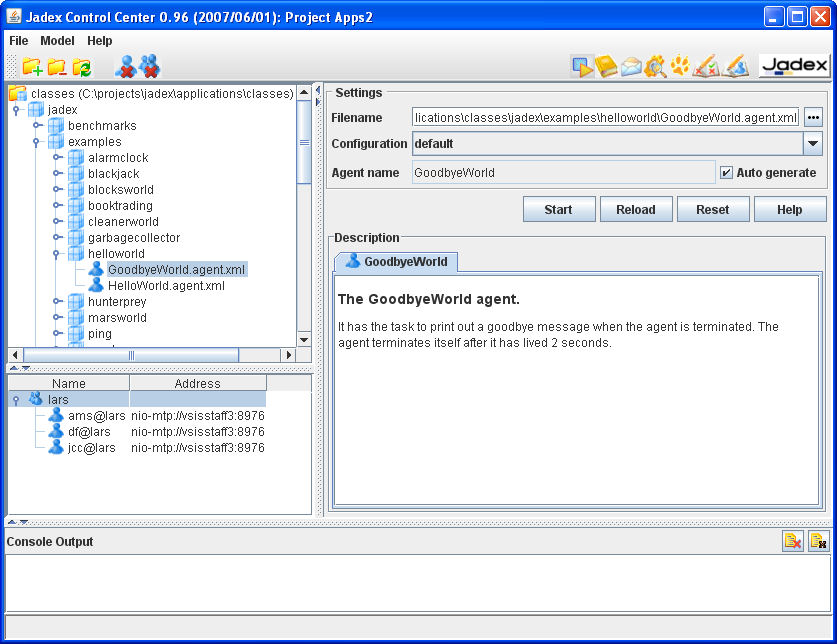
a menu bar for invoking basica actions. Concretely, the "File" menu provides options for loading/saving the current project settings. In addition, the currently opened project name is displayed in the JCC window's title bar (see Figure 2.1, “JCC window”). The "File->Settings" menu item allows to open the platform settings dialog described in Section 2.2, “Platform Settings”. The "File->Exit" menu item allows to close the GUI and kill the JCC agent, and optionally shutdown the whole platform. The "Help" menu provides access to the Jadex help system and the Jadex homepage. Besides this menus plugins may add additional entries that can be used for executing plugin-specific actions.
a tool bar that offers shortcuts for often used actions. The toolbar is thereby devided into two parts. On the left hand side plugin- specific actions are displayed. On the right hand side the available plugins are shown. The buttons at the right side of the toolbar allow to switch between the perspectives each provided by a plugin (Starter, DF Browser, Conversation Center, Introspector, Tracer, Test Center or Jadexdoc).

a console window nearly at the bottom of the JCC window. The console simply shows all output that is written to the System.out (black font color) and System.err (red font color) streams. The buttons on the right hand side allow to turn off the console and to clear the current output.

a status bar at the bottom of the JCC window. This bar fulfills two functionalities. On the left hand side currently relevant information is printed out, e.g. when a project was successfully loaded or an agent file was scanned for errors. On the right hand side small animated icons appear whenever some activity is performed in the background (e.g. scanning files for agent testcases).
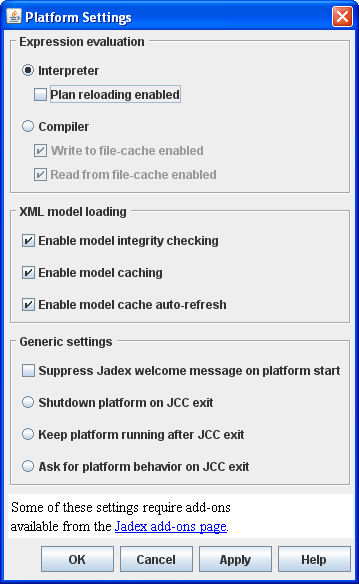
The settings dialog available from the "File" menu is used to set up diverse options for the Jadex platform and agent loading process. It is shown below in the Figure 2.2, “Platform settings dialog” and includes following options.
Expression evaluation. Jadex provides several options how to evaluate the Java expressions contained in ADFs. The built in interpreter features fast loading times, but limited runtime performance, as the Java statements have to be interpreted on every access. The interpreter allows to restart plan classes, when they have changed. This allows to try out a change in the Java code without having to restart the platform. Note, that this feature should only be used for debugging, as it slows down the system. The alternative to the interpreter is the on-the-fly compiler based on Janino, which is available from the Jadex homepage as an add-on. In order to further speed up the process of agent loading and execution, the compiled expressions may be saved directly to a cache file. The options "Write to file-cache enabled" and "Read from file-cache enabled" activate this behavior.
XML model loading. The XML model loading section allows to influence how Jadex loads agent and capability models. When integrity checking is enabled all loaded agent and capability models are checked against a set of consistency rules (syntax of Java expressions, validity of cross references between goals and plans, etc.). The platform will refuse to start invalid agent models. The feature can be disabled to improve performance in deployed applications. Furthermore it can be determined if model caching should be used. In case it is enabled Jadex will load a model only once from an XML file and will afterwards use a master Java model from which new model instances are cloned. With the auto-refresh option it can be specified if Jadex should always check the timeliness of the files. When turned off files will always be loaded from cache regardless of their timeliness.
Generic settings. The gereric settings allow for customizing several minor platform features. If the welcome message printed to the console shortly after start-up is unwanted it can be turned off here. Additionally the exit behaviour can be specified. The default behaviour when closing the JCC user interface is that the user is asked if he wishes to shutdown the platform also. To avoid this prompting it can be set to automatically shutdown the platform or keep it alive without asking.
 The Starter is a central administration tool for managing Jadex agents.
It offers basic functionalities for starting and stopping agents as well
as more advanced ones such as integrity checking
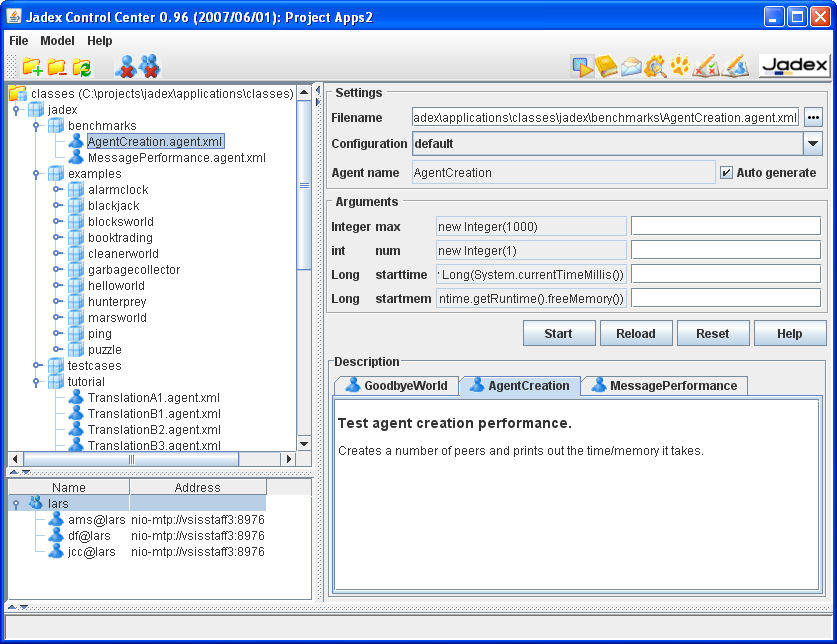
of agent and capability models. In Figure 3.1, “Starter perspective”
a screenshot of the Starter tool is depicted. The tool mainly consists
of three different panels. On the upper left hand side the
Model Tree is located. Below the Model Tree the
Running Agents of the platform are shown. On the
right hand side the Model Panel shows details of
the currently selected agent or capability model.
The Starter is a central administration tool for managing Jadex agents.
It offers basic functionalities for starting and stopping agents as well
as more advanced ones such as integrity checking
of agent and capability models. In Figure 3.1, “Starter perspective”
a screenshot of the Starter tool is depicted. The tool mainly consists
of three different panels. On the upper left hand side the
Model Tree is located. Below the Model Tree the
Running Agents of the platform are shown. On the
right hand side the Model Panel shows details of
the currently selected agent or capability model.
 can be used to add a new directory or jar file to the model tree
and to the classpath from which models are loaded.
can be used to add a new directory or jar file to the model tree
and to the classpath from which models are loaded.
 can be used to remove a directory or jar file from the model tree
and the classpath.
can be used to remove a directory or jar file from the model tree
and the classpath.
 represents a Java/Jadex package. All agents and capabilities
should be placed in the same package hierarchy as their
corresponding Java plans and other Java classes.
represents a Java/Jadex package. All agents and capabilities
should be placed in the same package hierarchy as their
corresponding Java plans and other Java classes.
 represents a Jadex agent model file. By selecting the file in
the tree the model will be loaded and displayed in the Model
Panel.
represents a Jadex agent model file. By selecting the file in
the tree the model will be loaded and displayed in the Model
Panel.
 represents a Jadex capability model file. By selecting the file in
the tree the model will be loaded and displayed in the Model
Panel.
represents a Jadex capability model file. By selecting the file in
the tree the model will be loaded and displayed in the Model
Panel.
View refresh.
In addition to the standard start and stop functionalities the model tree also
supports more advanced features. If not explicitly turned off in the "Model"
menu the tree is automatically refreshed in certain time intervals. This means that
changes on hard-disk are immediately reflected within the model tree. You can also
initiate a refreshment directly by clicking the
 button.
Integrity checking.
In addition all models found in the tree are automatically checked for integrity if
this feature isn't turned off in the "Model" menu. This feature allows
to effortlessly locate corrupt agent and capability files in the project. If
a corrupt file is found, the file as well as all packages up to the root are marked
as corrupt. A corrupt entity is displayed with a red bolt
 .
.
The Running Agents panel shows all currently alive agents of the platform. For each agent its name and the first transport address is shown. The following actions are available in this view:
 To kill an agent it has first to be selected. Thereafter
the kill action can be invoked via the popup menu or the toolbar.
To kill an agent it has first to be selected. Thereafter
the kill action can be invoked via the popup menu or the toolbar.
 With this action the whole platform can be shut down.
 This action will suspend the execution of an agent. This means the agent
will not execute any further activities but will still be present on the
platform and can be resumed later on. Its agent identifier remains valid
and the agent will store incoming message in its buffer.
This action will suspend the execution of an agent. This means the agent
will not execute any further activities but will still be present on the
platform and can be resumed later on. Its agent identifier remains valid
and the agent will store incoming message in its buffer.
-
This action allows to resume a formerly suspended agent.
In the Model Panel details of a loaded agent or capability are shown. A model can be loaded either by selecting a file from the Model Tree or by using the button to browse for a certain file. For a selected model several properties are presented:
Filename. The exact filename of the displayed model.
Configuration. This choice contains all available configurations of the agent or capability. The default configuration of the agent or capability is selected.
Agent name. The agent name is a necessary parameter for starting an agent. It represents the instance name for a new created agent from the loaded model. If you don't care about the agent's exact name you can turn on the "auto generate" option which will cause the platform generating an unused agent name. Otherwise you will have to supply a custom name via the offered textfield.
Arguments. The arguments are optional parameters for starting an agent. Input possibilities for arguments will only be available when the agent type includes declared arguments (i.e. exported beliefs). For each argument a separate row will be presented in which the name, type and default value of the argument are shown. (The default value may change depending on the chosen configuration). Additionally, a textfield per row will be presented that allows for entering a Java expression or value. The expression will be validated and incorrect inputs will be underlined in red.
Description. In the lower part of the Model Panel the description of the agent or capability is shown. The description is the HTML rendered output of the initial agent resp. capability comment of the model file. If the model contains errors an error report of all discovered bugs is displayed instead of the description.
If an agent model could be loaded without errors you can start a new agent instance of this model simply by hitting the button. If you changed a model you can load it from model again with the button. The button can be used to clear all fields and discard all loaded models from cache. Finally, the button allows to invoke the online JavaHelp.
 The DF browser can be used to display the current service registrations
of application agents. The left part of the browser view
(see Figure 4.1, “DF browser overview”)
shows the locally available DF agent of the platform. (Currently it
is not possible to include remote DF agents into the view). If the
DF agent is selected the currently registered agent descriptions and
services will be displayed in the center view. This view can be refreshed
by invoking the "refresh" popup menu directly on the DF agent.
In addition a regular refresh interval can be specified via the "Refresh"
menu, which offers the alternatives to perform a refresh "never", or
every "1", "5" or "30" seconds.
The DF browser can be used to display the current service registrations
of application agents. The left part of the browser view
(see Figure 4.1, “DF browser overview”)
shows the locally available DF agent of the platform. (Currently it
is not possible to include remote DF agents into the view). If the
DF agent is selected the currently registered agent descriptions and
services will be displayed in the center view. This view can be refreshed
by invoking the "refresh" popup menu directly on the DF agent.
In addition a regular refresh interval can be specified via the "Refresh"
menu, which offers the alternatives to perform a refresh "never", or
every "1", "5" or "30" seconds.
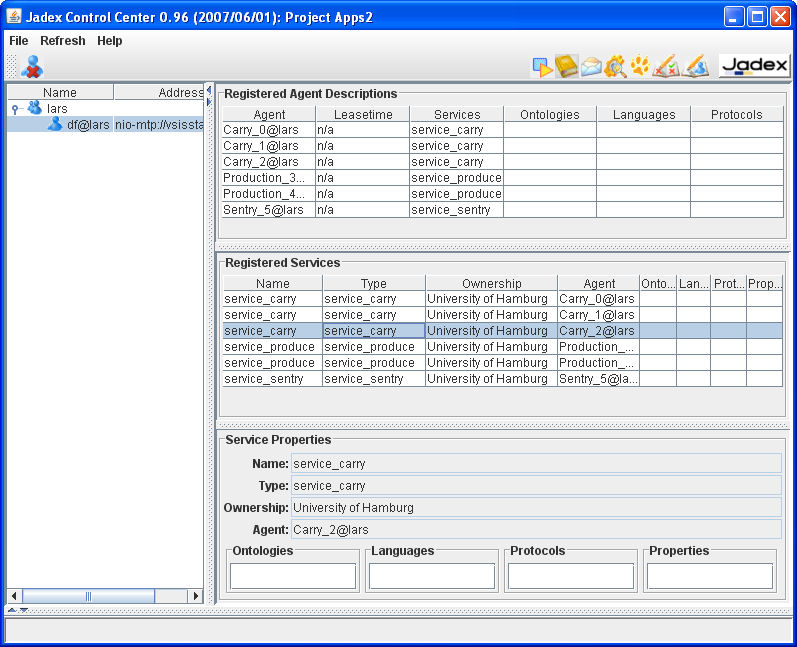
The center view is split-up into three different panels. The uppermost "Registered Agent Description" panel shows all agent descriptions of the selected DF agent, i.e. if no DF agent is selected no registrations will be visible. For each registered agent description, the agent name, the lease time, the contained services as well as a overview about the used ontologies, languages and protocols are shown.
Below the agent description panel the "Registered Services" panel shows agent services in more detail. For each service its name, type, ownership as well as a short info about ontologies, languages and protocols is displayed. Additionally an entry exists for the containing agent description making clear to which of the agent descriptions a service belongs. Per default the service descriptions of all agent descriptions are presented. Selecting an agent description in the "Registered Agent Description" panel restricts the services presented in the lower panel to those that belong to one of the selected agent descriptions.
In the lowermost panel one service is shown with all its properties, i.e. especially all contained ontologies, languages, protocols and properties can be inspected. The selection of the service description that should be made visible in the "Service Properties" panel has to be done in the "Registered Services" panel (here only a single selection is allowed).
 Besides viewing the registered agent descriptions and services the DF
browser can also be used for deleting obsolete agent descriptions. This
can be done by selecting the service (or services) in the agent description
panel and activating the remove operation via the popup menu or via
the corresponding button in the toolbar.
Besides viewing the registered agent descriptions and services the DF
browser can also be used for deleting obsolete agent descriptions. This
can be done by selecting the service (or services) in the agent description
panel and activating the remove operation via the popup menu or via
the corresponding button in the toolbar.
 The conversation center can be used to compose messages,
send messages to agents and inspect the received answers.
The left part of the panel (see Figure 5.1, “Conversation center overview”)
contains two lists for the latest sent and received messages. Double
clicking on a message from one of the lists will show the message
contents as a new tab on the right side.
The conversation center can be used to compose messages,
send messages to agents and inspect the received answers.
The left part of the panel (see Figure 5.1, “Conversation center overview”)
contains two lists for the latest sent and received messages. Double
clicking on a message from one of the lists will show the message
contents as a new tab on the right side.
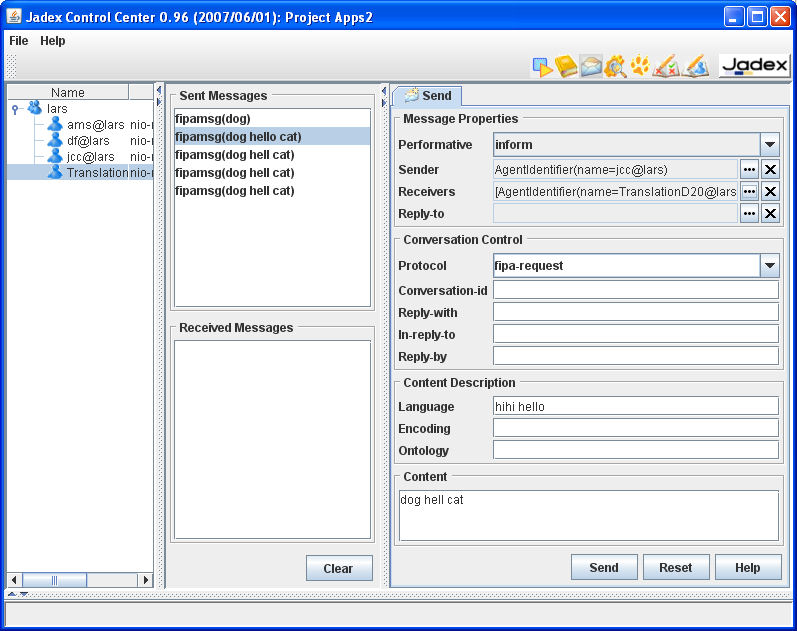
The send tab will always be present and allows to compose a new message for sending. The message format follows the FIPA standards (see FIPA ACL Message Structure Specification and [Jadex User Guide]). You can choose an appropriate performative for your message by using the drop down list of available performatives. The sender is by default initialized with the name of the control center agent. The receivers specify which agents will receive the message. If answers to the message should not be sent to the original sender (default) you can provide an optional reply-to agent. The agent identifiers for sender, receivers, and reply-to are selected using a separate dialog, which can be accessed by clicking the "..." button besides the text field. To clear the agent identifiers click on the "x" button to the right of the "..." button.
The other attributes of the message can be entered as plain strings. For the protocol you can also select one of the protocol types predefined by FIPA. Normally, only a few slots need to be filled in for a message. See e.g. Figure 5.1, “Conversation center overview”, which shows a message commonly used in the [Jadex Tutorial]. After composing the message it can be sent simply by hitting the "Send" button. If it was successfully sent, a copy of the message will be placed in the sent messages list.
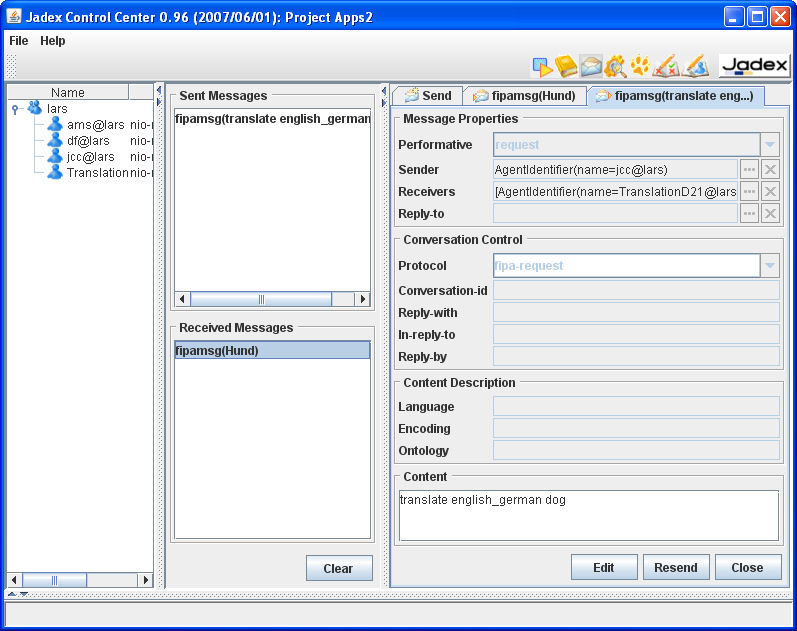
You can later reopen the message in a new tab by double-clicking it in the list. To resend the message without changes click the "Resend" button in the newly opened tab. If you wish to change the message before resending it use the "Edit" button instead, which will fill in the slots of the message in the send tab, so you can edit it.
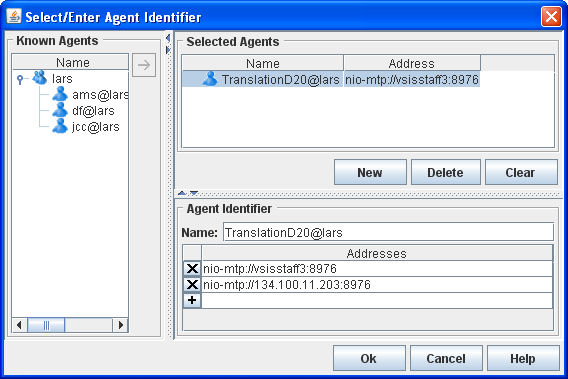
The left list of the agent selector dialog (see Figure 5.2, “Agent selector dialog”) shows the agents currently running on the platform. You can double-click on an agent from the list to select it. The upper list on the right side shows the currently selected agent(s). The buttons below the list allow to add a new agent identifier from scratch, which can be edited below the list. When you finished selecting agents, hit the "Ok" (or "Cancel") button at the bottom of the dialog.
The messages received by the conversation center agent are placed in the "Received Messages" list. Double-clicking on a received message will open it as a new tab (see Figure 5.3, “A received message”). When you want to reply to the message, click on the "Reply" button. The user interface will switch to the send panel, and fill in all slots (receiver, conversation-id, etc.) based on the received message. You can then edit the reply message and hit the "Send" button. If you want to get rid of the tab of a received message, you can use the "Close" button next to the "Reply" button.
 In the introspector perspective you can observe and manipulate
the internal state of agents.
In Figure 6.1, “Introspector overview” the introspector
is shown while observing an agent from the marsworld example.
You can use the agent tree at the left side to select agents you want to observe
(by double clicking or using the popup menu).
The observation view for the selected agent is shown
on the right side. In the observation views four different panels can be seen
and chosen.
The "Beliefbase", "Goalbase" and
"Planbase" tabs show the contents of the belief, goal
and plan base, respectively. Alle these panels are described in
Section 6.1, “Base Panels”. The
"Debugger" tab allows to observe and control the event processing,
consisting of plan selection and execution in the
debugger panel.
In the introspector perspective you can observe and manipulate
the internal state of agents.
In Figure 6.1, “Introspector overview” the introspector
is shown while observing an agent from the marsworld example.
You can use the agent tree at the left side to select agents you want to observe
(by double clicking or using the popup menu).
The observation view for the selected agent is shown
on the right side. In the observation views four different panels can be seen
and chosen.
The "Beliefbase", "Goalbase" and
"Planbase" tabs show the contents of the belief, goal
and plan base, respectively. Alle these panels are described in
Section 6.1, “Base Panels”. The
"Debugger" tab allows to observe and control the event processing,
consisting of plan selection and execution in the
debugger panel.

 When an agent is chosen for observation only those panels are initially
active that have been defined in the "Default Options" menu (active here
means that the views are continuously refreshed). If you want to activate
or deactivate a specific panel this can be done by using the start and
stop buttons from the menu bar. For making the state difference obvious
in a deactivated panel the background color will switch from white to light grey.
When an agent is chosen for observation only those panels are initially
active that have been defined in the "Default Options" menu (active here
means that the views are continuously refreshed). If you want to activate
or deactivate a specific panel this can be done by using the start and
stop buttons from the menu bar. For making the state difference obvious
in a deactivated panel the background color will switch from white to light grey.
Below the tabs in the observation window, a details panel shows details of elements (e.g. beliefs or events) selected with double click. This details panel is shared by all activated tabs, and therefore shows the last elements selected in any tab.

Three base panels show the beliefs ( ), goals (
 ), and plans (
 ) of the selected agent.
They are very similar in their usage (see
Figure 6.2, “The Beliefs Panel of Introspector”).
All elements are shown in a tree structure
representing the containment hierarchy of the elements
in the capabilities of the agent.
) of the selected agent.
They are very similar in their usage (see
Figure 6.2, “The Beliefs Panel of Introspector”).
All elements are shown in a tree structure
representing the containment hierarchy of the elements
in the capabilities of the agent.
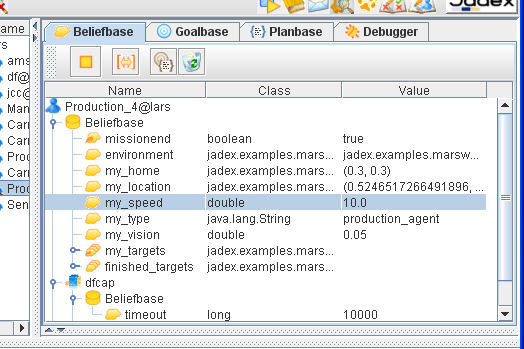
The different elements of the agent are shown with different icons as explained in Table 6.1, “Introspector Base Panel Elements”. For each element the most important attributes are displayed directly in the tree/table structure. The content of the base panels will automatically be updated when changes occur inside the agent.
Table 6.1. Introspector Base Panel Elements
| Element | Description |
|---|---|
|
|
The agent containing all other elements |
|
|
The capability with its contained elements |
|
|
The beliefbase containing all beliefs of a capability |
|
|
A single fact belief, or fact contained in a belief set |
|
|
A belief set containing a number of facts |
|
|
A belief visible in this capability, but declared elsewhere |
|
|
A belief set visible in this capability, but declared elsewhere |
|
|
The plan base containing all plans of a capability |
|
|
A currently running plan |
|
|
The goalbase containing all goals of a capability |
|
|
A currently adopted perform goal for executing actions. |
|
|
A perform goal reference on a currently adopted perform goal. |
|
|
A currently adopted achieve goal that aims at establishing a specified world state. |
|
|
An achieve goal reference on a currently adopted achieve goal. |
|
|
A currently adopted query goal that aims at fetching some information. |
|
|
A query goal reference on a currently adopted query goal. |
|
|
A currently adopted maintain goal that aims at monitoring and re-establishing a specified world state. |
|
|
A maintain goal reference on a currently adopted maintain goal. |
|
|
A meta goal that is used for deciding among different applicable plans for one goal or event. |
|
|
A reference to a meta goal. |


The tree component allows nodes to be closed to focus on interesting subsets of the agent's functionality. The column widths can be (auto-) adjusted by dragging or double-clicking between the column headers. The table headers also provide a popup->menu (opened with right-click) that allows to hide some of the columns for better readability. You can double click on the elements to see more detailed information. The details panel is not automatically updated, you may have to double click the element again, to see up to date information.
You can to some extent manipulate the elements shown in the base panels. E.g. you can alter the values of facts in the beliefbase. Double click on the fact value you wish to change (in the value column), and then enter the new value as Java expression (i.e "text" for a string value). The expressions are evaluated using the imports as specified in the ADF (of the corresponding capability) therefore you can write expressions just as you would do that in a <fact> tag of the ADF. In addition, popup menus are available e.g. to remove beliefs, terminate plans or change the state of goals.
Some options are available to influence the appearance of the base panels (see Table 6.2, “Introspector Base Panel Options”).
Table 6.2. Introspector Base Panel Options
|
|
Resize all columns to fit to length of contained entries |
|
|
Show / hide removed elements (e.g. finished plans) |
|
|
Flush removed elements from memory |
|
|
Toggle goalview / planview (only for goalbase tab) |


The resize icon allows to auto-adjust the widths of the table columns to fit the displayed content. The next two icons are concerned with the presentation of removed elements. Because the final state of a goal or a plan may be of interest after the goal has been dropped or the plan has terminated, the panels have an option not to remove those elements from the representation, but just visually mark them as removed. This is especially useful for debugging your agents, e.g. in conjunction with the debugger view described in the next section. To flush removed beliefs, goals and plans from the representation, you can use the waste bin icon.
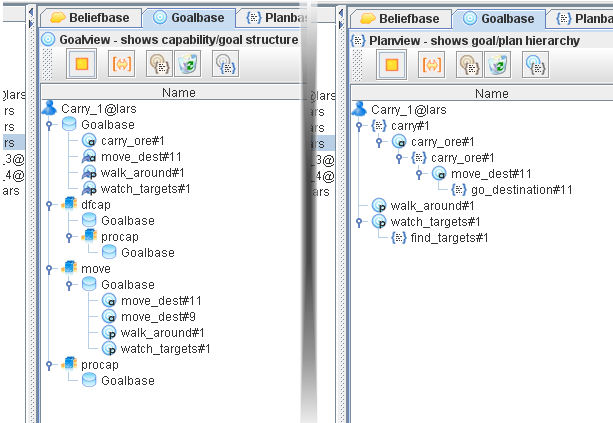
The last icon is only available in the goalbase panel.
It allows to switch between the goalview and the planview representation
of the agent's current goals.
The goalview, shown by default, displays only the goals and goal
references in the context of their containing capabilities.
In the planview the global goal-plan hierarchy of the agent is
displayed. This means that the causal relationships of the
agent's goal structure are visible. Starting with some top-level
element, which can be a top-level goal or plan, it is shown which
subelements are connected with it, i.e. which plan is currently executed
for a goal, which subgoal the plan has dispatched and so forth.
Both views are compared in Figure 6.3, “Goalview and planview”.
In the planview you can see that the move_dest#11 achieve
goal was actually created by a plan as a subgoal of the
carry_ore#1 achieve goal.
 The debugger panel allows watching the internal
processing inside an agent. The window is made up of the agenda area,
the agenda control area in the middle and the details view at bottom (see
Figure 6.4, “The Debugger Panel of Introspector”.
The debugger panel allows watching the internal
processing inside an agent. The window is made up of the agenda area,
the agenda control area in the middle and the details view at bottom (see
Figure 6.4, “The Debugger Panel of Introspector”.
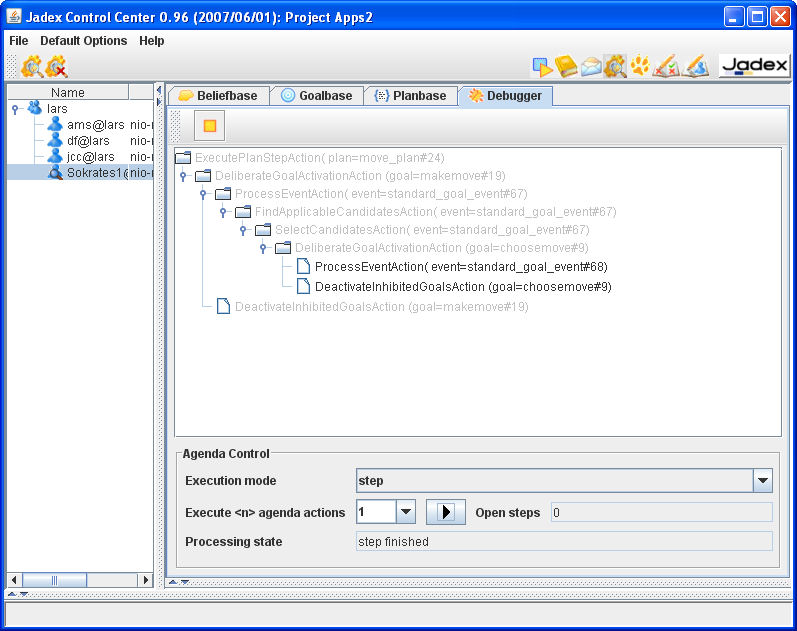
The agenda contains all current action entries of the agent, whereby entries in light-grey denote already processed actions. In addition it can be seen whether entries currently have a valid precondition and thus can subsequently be executed; otherwise they are marked as (invalid). Such invalid actions will not be executed, but just ignored by the execution mechanism. To see some more information about an agenda action you can double-click on it and inspect its values in the details view. In addition to observing the agent's internal behavior the tool also allows you to control the agenda execution by performing actions in step mode. If the execution mode is set to "step" or "cycle" you can use the "forward" button to execute as many steps as shown in the "execute <n> agenda actions" choice. The difference between step and cycle mode concerns only the execution of ProcessEventActions that are decomposed to finer-grained sub steps (FindApplicableCandidatesAction, SelectCandidatesAction and ScheduleCandidatesAction) when the "step" mode is activated. Therefore, the step mode allows you to examine the details of the BDI plan selection process what can be helpful in understanding and explaining unexpected application behavior. The "open steps" status bar shows the progress of the action execution by highlighting the number of steps the agent still has to perform whereas in the the "processing state" line it can be seen if a step is currently requested or has been finished.
 The BDI Tracer is accessible from the Jadex Control Center tool
bar. It is a tool inspired by
the Ph.D. work of Dung N. Lam
working on agent software comprehension with abductive
reasoning.
The tracer provides basically an interface and means to log the
internal state of a BDI agent, and to analyze and visualize the
logged information. It is made of two components. The first one
is the TracerAdapter placed in front of an agent as a tool
adapter. It is responsible for filtering messages concerning the
tracing process away from the message queue of an agent and it
collects the information about agent's internal state changes
and other occurrences in the system. The information is then
sent to the Tracer Agent, if an instance is present on the
platform. The latter has the duty to analyze the traces, store
them, and to present them to the user in a graphical form.
The BDI Tracer is accessible from the Jadex Control Center tool
bar. It is a tool inspired by
the Ph.D. work of Dung N. Lam
working on agent software comprehension with abductive
reasoning.
The tracer provides basically an interface and means to log the
internal state of a BDI agent, and to analyze and visualize the
logged information. It is made of two components. The first one
is the TracerAdapter placed in front of an agent as a tool
adapter. It is responsible for filtering messages concerning the
tracing process away from the message queue of an agent and it
collects the information about agent's internal state changes
and other occurrences in the system. The information is then
sent to the Tracer Agent, if an instance is present on the
platform. The latter has the duty to analyze the traces, store
them, and to present them to the user in a graphical form.
The main window of the tracer agent may be seen in Figure 7.1, “Tracer Main Window”.
The traces presented above are from the Blocksworld example. In order to indicate a type of traces, they are marked with icons and their different meaning is explained in Table 7.1, “Information logged by the tracer”:
Table 7.1. Information logged by the tracer
|
|
Actions describe internal processes (i.e. internal agenda meta actions) of an agent and are by default ignored by the tracer. |
|
|
Beliefs are meta traces that collect all traces concerning the use of beliefs and their change. Belief read and write access indicate that an agent or one of its plans have accessed a belief and possibly changed it. |
|
|
The icons stand for message reception or send events respectively. |
|
|
Goals are traced when they are adopted by the agent. The icons on the left side represent different goals: achieve goal, perform goal, query goal, maintain goal, meta goal. |
|
|
Plans are shown, when created in response to a goal or event. |
|
|
Internal events are traced whenever they are dispatched within the agent. |


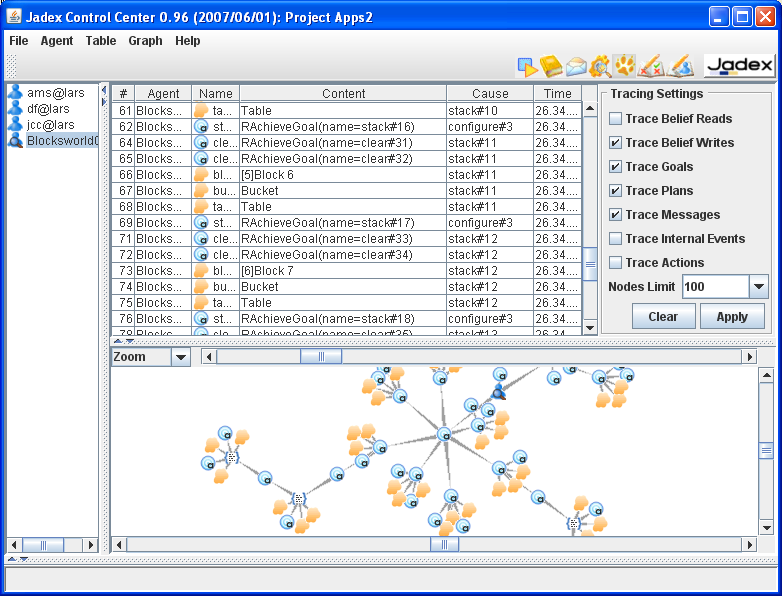
The tracer perspective is split into four views including a tree view of agents and traces, a tabular view of traces, tracing settings and a 2D trace space exploring panel.
At the left there is a tree view showing all agents known to the tracer. The meaning of a particular icon depicting an agent is shown in Table 7.2, “State of an agent”. Descending from the BDI agents, all traces are linked beneath nodes identified to be their cause.
Table 7.2. State of an agent
|
|
The agent is ignored by the tracer. |
|
|
The agent sends its traces to the tracer. |
|
|
The agent has died. |


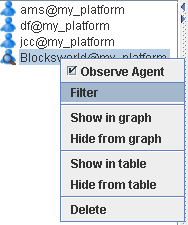
The functionality provided by the tree popup menu is similar to the functionality from the menu (Section 7.2.1, “Agent Menu”) and concerns the currently selected trace or agent. In the case of an agent the user may choose to observe it and to adjust the trace filter and history limit (). The other options allow to show or hide traces in the graph or table. With the last menu item the trace or the agent may be removed from the tracer perspective.
On the right side there are three views. The upper one in the middle shows a tabular view of the traces, as can be seen in Figure 7.3, “Trace Table”:
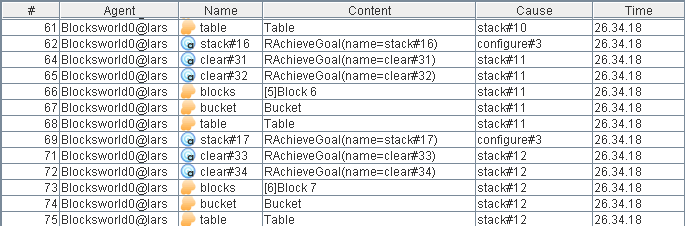
The traces are ordered in the sequence they arrive. The table shows information like a unique trace id, the agent name, the event name, The event name and the content are closely related and explain which kind of event occurrence has happened. The cause describes the reason for the event occurrence and the time shows when the event has happened.
The user may select traces in the table based on different criteria, remove them from the table, show them in the graph panel or delete from the tracer perspective. All the fuctionality is accessible under the (Section 7.2.2, “Table Menu and Tracing Settings”) and a corresponding popup menu.
The view on the upper right side, offers some tracing settings, as can be seen in Figure 7.4, “Tracing Settings”:
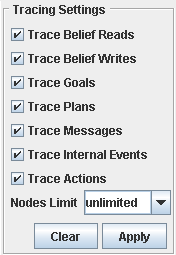
Check boxes let the user specify what to trace and above the number of traces to show can be chosen from a pull down menu. The changes can be applied by the button “apply” and the other button labled with “clear” clears the trace table.
The lower one of the three right views is the graph panel allowing to explore the space of traces. It also provides multiple presentation options e.g. for selection of and correletion and between the traces. All this functionality may be accessed from the "Graph" and the graph popup menu. (see Section 7.2.3, “Graph Menu”).
The menu provides access to functions concerning the tracer agent itself and the BDI agents analyzed. Functions corresponding to the tabular view and the 2D graph view are also accessible from here.
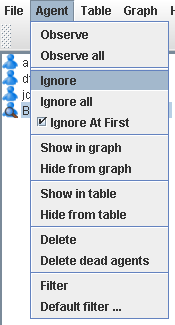
Under this menu (cf. Figure 7.5, “Agent Menu” concerning agents the user has the option to:
- an agent. This will tell the agent to send its traces to the tracer.
- will cause all BDI agents (known to the tracer) to send their data.
- an agent. Has the complementary effect to Observe.
- is the reverse of Observe all.
- causes the tracer to ignore all newly occurring agents.
- tells the tracer to show the traces of an agent in the 2D graph as soon as they arrive.
- removes all agent traces from the 2D graph.
- tells the tracer to show the traces of an agent in the table.
- removes all agent traces from the table.
- removes the agent and corresponding traces from all views.
- removes all dead agents and their traces from all views.
- shows a filter dialog for the current selected agent.
- shows a filter dialog for a prototypical agent all new agents will inherit their properties from.
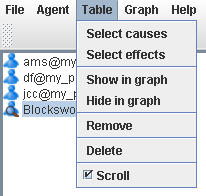
The menu (cf. Figure 7.6, “Table Menu” ) provides functionality concerning the table view. Following options are available to the user:
- selects immediate causes of selected traces.
- selects the immediate effects.
- shows all selected traces in the 2D graph.
- hides selected traces from the 2D graph.
- removes traces from the table.
- deletes the traces and removes them from all views.
- tells if the table should be scrolled, when new traces arrive.
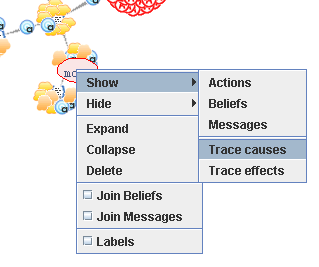
The tracer graph menu is accessible from the main menu and as popup in the graph view (cf. Figure 7.7, “Graph Popup Menu” ). It provides access to following functions:
- is used to show actions, beliefs or messages connected to trace nodes already shown in the graph. If a trace is selected, the user may choose to show the causes and effects of that trace.
- hides actions, beliefs or messages from the graph view. A single trace, its causes or its effects may be removed from the view.
- will expand the trace by one level of the causes or effects.
- will shrink and hide the traces around the selected one.
- will remove the trace from all views in the tracer.
- may be used to collapse all belief access nodes into a single one.
- will join the send and receive events of a message with an edge, therefore establishing connections between agents.
- this check-box indicates that the traces in the graph should be shown with thier corresponding labels instead of an anonymous icon. The labels are truncated by length and a selected trace is always shown with its label.
 The test center offers the possibility to implement agent-based unit tests similar to
object-oriented unit tests (cf. the test framework JUnit).
In contrast to object-oriented tests in the Jadex framework the tested unit is not an object
but an agent. As agents can exhibit arbitrary complex reactive and proactive behaviour its
testing is far more difficult than it is in the object-oriented case. One reason for these
difficulties is that it is hard to set-up a defined start state which is always used to perform
the tests as agents can actively modify that state. Hence, the Jadex unit test framework
concentrates on the validation of inner-agent functionalities such as black-box testing
of functionalities from capabilities and other agents. Similar to the object-oriented testing also in Jadex
specific test agents (similar to test classes) can be implemented. Each test agent can perform
an arbitrary number of single test cases.
The test center offers the possibility to implement agent-based unit tests similar to
object-oriented unit tests (cf. the test framework JUnit).
In contrast to object-oriented tests in the Jadex framework the tested unit is not an object
but an agent. As agents can exhibit arbitrary complex reactive and proactive behaviour its
testing is far more difficult than it is in the object-oriented case. One reason for these
difficulties is that it is hard to set-up a defined start state which is always used to perform
the tests as agents can actively modify that state. Hence, the Jadex unit test framework
concentrates on the validation of inner-agent functionalities such as black-box testing
of functionalities from capabilities and other agents. Similar to the object-oriented testing also in Jadex
specific test agents (similar to test classes) can be implemented. Each test agent can perform
an arbitrary number of single test cases.
The graphical testcenter tool offers an easy to use interface that allows to run a bundle of testcases (called a test suite) and shows a green bar if all the testcases could be performed successfully and a red one otherwise, together with debug information.

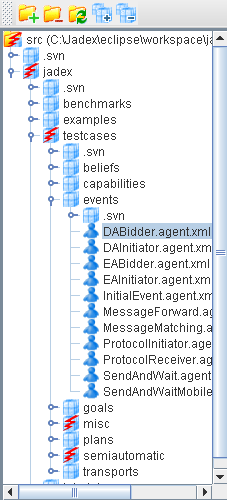
The testcenter is subdivided into four panels (cf. Figure 8.1, “Test center overview”). The model tree on the left shows the agents of the project and highlights those that have been recognized as testable (that use the test capability). The "Test suite settings" panel contains a list of all test agents that belong to the current test suite. Below that panel the "Test suite execution" panel provides means for initiating resp. aborting the test suite execution and offers overview information about the current state of the execution. At the bottom the "Details" panel provides in-depth information about the results of the single tests.
Below a more detailed description of the panels and their usage is given.
 .
Each source folder that contains at least one testable agent changes its icon
to red and green
.
Each source folder that contains at least one testable agent changes its icon
to red and green
 and the packages that contain tests change the red and green icon to
 .
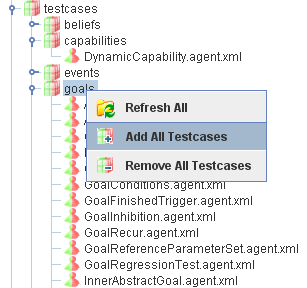
For adding resp. removing testable agents to/from the test suite different options are available:
.
For adding resp. removing testable agents to/from the test suite different options are available:
Adding a single test case can be done by double-clicking the testable agent.
Activating the popup menu on a single test case agent allows for adding
 or removing
 the selected test case.
Activating the popup menu on a test case folder allows for adding
 or removing
 recursively all contained test cases.
After having selected an agent or a folder adding
or removing
these items can also be done by using the corresponding buttons from the tool bar.
The test suite settings panel offers information about the current test suite.

All the testable agents of the test suite appear in the list. With the x-symbol you can remove testcases, with the "+"-symbol you can add new test suites and enter their name manually.
The checkbox below the list allows to turn on or off checking for duplicates. If duplicates are forbidden the addition of testcases that are already contained in the list will have no effect. Otherwise you can add the same testcase more than once.
The testcase timeout option allows for specifying the maximum amout of time that a single test agent is permitted to be executed. If the test agent does not return the test results within this timeframe it will be considered as failed. The default timeout for testcases is 20000 ms and can be adapted if necessary, i.e. if one of test agents needs a longer test execution time.
The testcase cuncurreny setting can be used to determine how many test agents should be executed at the same time. By setting the concurrency to 1 a sequential execution can be enforced. In general, the concurrent execution has several consequences. One important pragmatic aspect is that the execution will be much faster as the center can always execute some test and needs not to wait for the result of one specific test. On the contrary the parallel execution of tests also may lead to non-deterministic test results, if timeouts are used and the system load becomes too high. On the right hand side four buttons are offered. One for adding a testcase from the file system, two for loading and saving the test suite and one for clearing the current test suite.
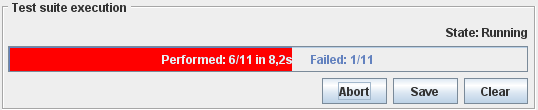
The test suite execution panel shows the test execution progress bar. This progress bar is green as long as all tests have been successfully executed. The first failed test causes the progress bar changing its color from green to red. Furthermore the progress bar contains overview information about the number of already executed tasks (performed: x/total), the time the exexcution took so far and the number of failed tests (failed: y/total).
The panel also offers three buttons, to run the test suite execution, save the test report and to clear the results of a previous test suite execution. The run button can be used to start the execution and changes to an abort button during execution. Pressing abort immediately stops the current execution. The save button can be used to store the detailed test result permanently in a file. The output file is saved in HTML and can hence be loaded by any browser. The clear button can be utilized to delete the contents of the details panel and additionally resets the progress bar.
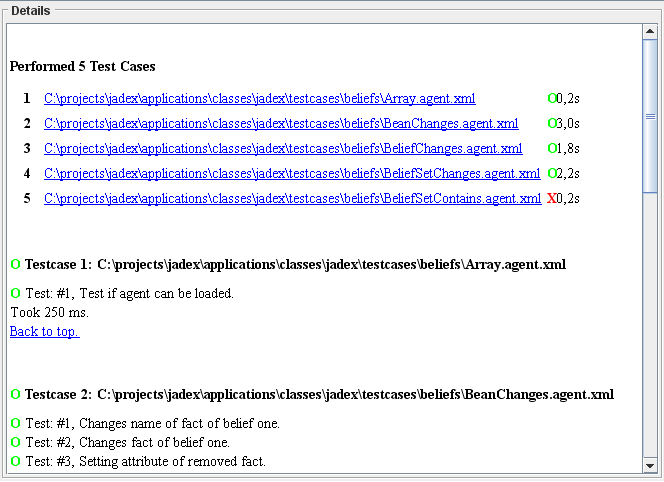
The details panel shows the detailed results of the testcase execution, including a detailed report about success and failure of the testcases (cf. Figure 8.5, “The details panel”).
The report begins with a test execution summary which lists all the test agents and shows the execution state. Tests that are currently in execution are marked as "?", whereas already failed tests are visualized with "X" and succeeded tests with "O". In addition the overview shows the execution time that was needed for each of the test agents.
Below the execution overview the detailed results are depicted. For each test agent a list of all the performed test cases is shown. Each test case report consists of the name, description and a result. In case of a testcase failure additionally a failure reason is displayed.
In this section it will be described how agent-based testcases can be written. The test agents can be executed either in the testcenter tool, or as they are normal agents in the starter tool. If you start them in the starter tool, the test output will be written to the console.
For the construction of a testable agent it is necessary to include (and make available)
functionality of the jadex.planlib.Test capability. In general,
this capability is responsible for collecting user-defined
jadex.planlib.TestReports and sends them back to the test center
after all tests of a test agents have been carried out. Conceretely, a test agent has
to import resp. reference the following elements of the Test capabiliy:
Reference the "reports" beliefset to which test reports have to be added.
Reference the "testcase_cnt" belief which determines the number of tests to perform in the test agent.
Reference the "timeout" belief which determines the timeout for the test agent. Within this deadline the test agent has to execute all declared tests and send back the results to the test center. The timeout is used as an agent argument (
exported="true") and will be set by the test center automatically when creating a test agent.Reference the "testcenter" belief which is needed for being able to send back the test results to the test center. The test center identifier is used as an agent argument (
exported="true") will be set by the test center automatically when creating a test agent. When no testcenter identifier is set, e.g. when starting a test agent manually, test results are automatically written to the console.
In the following a template ADF is depicted that shows exactly how the described elements need to be included:
...
<capabilities>
    <capability name="testcap" file="jadex.planlib.Test"/>
    ...
</capabilities>

<beliefs>
    <beliefsetref name="reports" class="TestReport">
        <concrete ref="testcap.reports"/>
    </beliefsetref>
    <beliefref name="testcase_cnt" class="int">
        <concrete ref="testcap.testcase_cnt"/>
    </beliefref>
    <beliefref name="timeout" class="long" exported="true">
        <concrete ref="testcap.timeout"/>
    </beliefref>
    <beliefref name="testcenter" class="jadex.adapter.fipa.AgentIdentifier" exported="true">
        <concrete ref="testcap.testcenter"/>
    </beliefref>
    ...
</beliefs>

<configurations>
    <configuration name="default">
        <beliefs>
            <initialbelief ref="testcase_cnt">
                <fact>...</fact> <!-- Here the actual number of testcases needs to be entered. -->
            </initialbelief>
        </beliefs>
        <plans>
            <initialplan ref="test"/>
        </plans>
    </configuration>
</configurations>
...
Figure 8.6. The ADF of a testable agent
Besides the test preparation the test cases have to be written in a plan which normally is defined also as initial plan of the test agent. In the following code snippet (Figure 8.7, “ The plan for a testable agent ”) it is depicted what steps usually make up one test case.
...
public void body()
{
    ...
    TestReport tr = new TestReport("#1", "The description of what is tested.");

    try
    {
        // Test code goes here, e.g.:
        // IGoal mygoal = createGoal("my_goal");
        // dispatchSubgoalAndWait(mygoal);
        tr.setSucceeded(true);
    }
    catch(GoalFailureException e)
    {
        tr.setFailed("Exception occurred: " + e);
    }
    getBeliefbase().getBeliefSet("reports").addFact(tr);
}
...
Figure 8.7. The plan for a testable agent
The test plan should take care of creating a test report (jadex.planlib.TestReport)
before the actual test code and initialize it with a name (e.g. the number of the test) and
a short description of what is to be tested (both appear in the test report details).
Below that setup code the domain dependent test code can be placed. Usually, it is advantageous surrounding that test code with a try-catch block so that any occurring exception can be handled and the plan is capable of continuing with the execution of futher test cases from the same plan.
If the execution of the test was successful (e.g. when no exception occurred and the
results are as expected), this should be marked in the test report via the
setSucceeded(true) method.
In case of a failure, the setFailed()-method can be used.
It requires an error description to be given as parameter.
The test case execution is finished by adding the corresponding test report to the
“reports”-beliefset (see Figure 8.6, “
The ADF of a testable agent
”) by calling
getBeliefbase().getBeliefSet("reports").addFact(tr);.
The test agent won't terminate successfully until the last report is added to
the “reports”-beliefset.
If you want to do any cleanup operations before terminating, this should be done before adding the last test report to the “reports”-beliefset. The reason is that the Test capability will immediately notice when the declared number of test cases has been executed and will subsequently send back the test results to the test center and terminate the test agent.
The Jadexdoc Tool is a documentation tool similar to the Javadoc tool.
It provides the ability to generate HTML pages for
ADF (Agent Description File) documentation from Jadex source files.
The Jadexdoc tool parses the declarations and documentation comments
in a set of agent description files and produces a corresponding set of
HTML pages describing the agents, capabilities, beliefs,
goals, plans, events and expressions. You can use it to generate the ADF
documentation or the implementation documentation for a set of agents and
capabilities. The Jadexdoc tools can be run together with the Javadoc
tool in order to document the agents as well as the used Java classes.
Jadexdoc will use the generated Javadoc documentation and generate links for
the corresponding classes.
You can run the Jadexdoc tool on entire packages, individual
source files, or both. When documenting entire packages, you can either traverse
recursively down from a top-level directory, or pass in an explicit list of
package names. When documenting individual source files, you pass in a list of
source (.agent.xml or .capability.xml)
filenames.
The easiest way to use the Jadexdoc tool is via the plugin which provides a gui simplifying the documentation task:

There are three basic panels in this graphical tool. The model tree on the left hand side, the package panel and the settings panel. They will be described in detail below.
On the left upper side there is the model tree which is already known from other tools such as the starter tool (see Section 3.1, “Model Tree”):
With this panel you can manage adding packages or single files to your selection of files of which you want to create the Javadoc/Jadexdoc. For this purpose the following actions are available via popup (and also partially via the tool bar above):
 For adding the selected package to the list of packages to document.
 For adding the selected package and all recursivly contained subpackages
to the list of packages to document.
For adding the selected package and all recursivly contained subpackages
to the list of packages to document.
 For removing the selected package to the list of packages to document.
 For removing the selected package and all recursivly contained subpackages
to the list of packages to document.
For removing the selected package and all recursivly contained subpackages
to the list of packages to document.
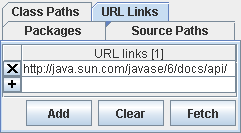
In the middle you can find a panel which displays selections of “Packages”, “Source Paths”, “Class Paths” and “URL Links”:
The“Packages” tab shows the packages and files that should be documented by the Jadexdoc and Javadoc tools.
In the “Source Paths” tab the path(s) to the sources of the packages and files to document can be defined. In case of Jadexdoc source paths are normally not that important because the ADF files are contained in the "classes" folder, too. With respect to Javadoc source path are more important as Javadoc always needs the Java source files for accessing the Javadoc comments which are not present in the compiled classes any more.
In the “Class Paths” tab the class path can be edited. This can be done either by hand or by clicking on the “Fetch” button which results in fetching the currently used class paths.
If you finally choose the tab “URL Links” you can specify locations you want to cross-link to in your doc-files. If you click on fetch this will insert an entry for the URL to the Standard JDK Java API. This will enable Javadoc and Jadexdoc to generate links for the standard Java classes such as String, Integer etc.
On the right hand side you can find the settings panel, where some detailed settings for Javadoc and Jadexdoc and be defined:
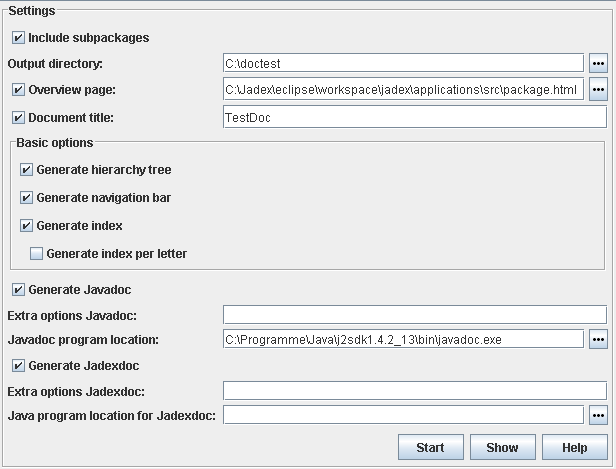
The "Include subpackes" check box can be used for automatically including subpackages. This means if this option is checked the tools will generate documentation for all selected packages (and files) and all of the recursively contained subpackages.
Via the "Output directory" textfield it can be defined to which directory the documentation should be generated. The standard output directory is the current directory. The button can be used to select another appropriate target directory.
The "Overview page" represents the top-level page for the whole generated documentation and contains information about the contained packages. The button can be used to select a custom overview HTML page. The overview page will only be included when the corresponding check box is selected.
The "Document title" option can be used for specifying the title to be placed near the top of the overview summary file. The title will be placed as a centered, level-one heading directly beneath the upper navigation bar. The title will only be included when the corresponding check box is selected.
The "Basic options" can be used to turn on/off several generation features. The hierarchy tree is a page containing agents and capabilities displayed in usage relationships. The navigation bar offers possibilities to refer to related documentation pages. It can be turned off if you are interested only in the content and have no need for navigation, e.g. when converting the files to PostScript or PDF for print only. The index holds an alphabetical list of elements. It can be adjusted with an options in a way that only one letter per page is generated.
The "Generate Javadoc" check box can be used to turn on/off the invocation of the Javadoc tool.
In the extra options text field an arbitrary number of additional Javadoc command line options can be specified.
The "Javadoc program location" option allows for specifying the program location of the Javadoc tool, which belongs to the standard JDK edition.
The "Generate Jadexdoc" check box can be used to turn on/off the invocation of the Jadexdoc tool.
In the extra options text field an arbitrary number of additional Jadexdoc command line options can be specified.
The "Java program location" option allows for specifying the program location of the Java program (e.g. java.exe on Windows systems), which belongs to the standard JDK edition and is required for the invocation of the Jadexdoc tool.
During the documentation generation, there will appear an animated icon in the bottom
right corner. While running Javadoc, it shows a Java icon scanned by a red bar
 , while running Jadexdoc, an icon with an agent scanned by a red bar is displayed
 .
.
The Jadexdoc and Javadoc tools both use the standard Java output and error streams (System.out and System.err) for printing out information about the generation progress. The console panel of the JCC allows for inspecting these outputs directly in the tool (see also Section 2.1, “Using the JCC”).

On the top right of the console outputs, there are two buttons. With the left one, you can turn on and off the console output during a run, with the right one you can clear the console.
You can start the Jadexdoc tool from a console via:
java jadex.tools.jadexdoc.Main [options] [packagenames] [sourcefilenames] [-subpackage pck1:..]Description. Arguments can be in any order. See processing of Source Files for details on how the Jadexdoc tool determines which source files to process.
options. Command-line options, as specified in this document. The section options below contains examples of Jadexdoc options.
packagenames. A series of names of packages, separated by spaces, such as
jadex.examples jadex.planlib. You must separately specify each package you want to document. Wildcards are not allowed; use-subpackagesfor recursion. For further details see the section Section 9.6, “Options”.sourcefilenames. A series of source file names, separated by spaces, each of which can begin with a path and contain a wildcard such as asterisk (*). The Jadexdoc tool will process every file whose name ends with ".agent.xml" or ".capability.xml".
-subpackages
pck1:pck2:...Generates documentation from source files in the specified packages and recursively in their subpackages as an alternative to supplying packagenames or sourcefilenames.
The Jadexdoc tool will generate output originating from four different types of "source" files: Agent and Capability source files, package comment files, overview comment files, and miscellaneous unprocessed files.
Processing of source files. The Jadexdoc tool processes files that end with ".agent.xml" and ".capability.xml" plus other files described below. If you run the Jadexdoc tool by explicitly passing in individual source filenames, you can determine exactly which ADF files are processed. However, that is not how most developers want to work, as it is simpler to pass in package names.
Package Comment Files. Each package can have its own documentation comment, contained in its own "source" file, that the Jadexdoc tool will merge into the package summary page that it generates. You typically include in this comment any documentation that applies to the entire package.
To create a package comment file, you must name it
package.html and place it
in the package directory in the source tree along with the agent description
files. The Jadexdoc tool will automatically look for this filename in this
location. Notice that the filename is identical for all packages.
The content of the package comment file is one big documentation comment, written
in HTML, like all other comments. When writing the comment,
you should make the first sentence a summary about the package, and not put a title
or any other text between <body> and the
first sentence.
When the Jadexdoc tool runs, it will automatically look for this file; if found, the Jadexdoc tool does the following:
Copies all content between
<body>and</body>tags for processing.Inserts the processed text at the bottom of the package summary page it generates, as shown in Package Summary.
Copies the first sentence of the package comment to the top of the package summary page. It also adds the package name and this first sentence to the list of packages on the overview page.
Overview Comment File. Each application or set of packages that you are documenting can have its own overview documentation comment, kept in its own "source" file, that the Jadexdoc tool will merge into the overview page that it generates. You typically include in this comment any documentation that applies to the entire application or set of packages.
To create an overview comment file, you can name the file anything you want,
typically overview.html and place it anywhere, typically at the top
level of the source tree. The content of the overview comment file is one big documentation comment,
written in HTML, like the package comment file described previously.
When you run the Jadexdoc tool, you specify the overview comment file name with
the -overview option. The file is then processed similar to that of a package
comment file.
Copies all content between
<body>and</body>tags for processing.Inserts the processed text at the bottom of the overview page it generates.
Copies the first sentence of the overview comment to the top of the overview summary page.
Miscellaneous Unprocessed Files. You can also include in your source any miscellaneous files that you want the Jadexdoc tool to copy to the destination directory. These typically includes graphic files, example agent description files, and self-standing HTML files whose content would overwhelm the documentation comment of a normal agent description file.
To include unprocessed files, put them in a directory called doc-files which
can be a subdirectory of any package directory that contains source files. You can
have one such subdirectory for each package. For example, if you want to include
the image of a creature Creature.png in the
jadex.examples.hunterprey.creature.CleverPrey agent documentation, you place
that file in the jadex/examples/hunterprey/creature/doc-files/ directory.
Notice the doc-files directory should not be located at
jadex/examples/doc-files/ because examples does not
directly contain any source files.
All links to these unprocessed files must be hard-coded, because the Jadexdoc
tool does not look at the files, it simply copies the directory and all its
contents to the destination. For example, the link in the
CleverPrey.agent.xml
doc comment might look like:
<!-- The image of the CleverPrey agent: <img src="doc-files/Creature.png"> -->
By default, Jadexdoc uses a standard doclet that generates HTML-formatted
documentation. This doclet generates the following kinds of files (where each
HTML "page" corresponds to a separate file). Note that Jadexdoc
generates files with two types of names:
those named after agents/capabilities, and those that are not (such as
package-summary.html).
Files in the latter group contain hyphens to prevent
filename conflicts with those in the former group.
Basic Content Pages.
One agent (
agentname.agent.html) or capability (capabilityname.capability.html) page for each agent or capability is documented.One package page (
package-summary.html) for each package it is documenting. The Jadexdoc tool will include any HTML text provided in a file namedpackage.htmlin the package directory of the source tree.One overview page (
overview-summary.html) for the entire set of packages. This is the front page of the generated document. The Jadexdoc tool will include any HTML text provided in a file specified with the-overviewoption. Note that this file is created only if you pass into Jadexdoc two or more package names.
Cross-Reference Pages.
One agent/capability hierarchy page for the entire set of packages (
overview-tree.html). To view this, click on "Overview" in the navigation bar, then click on "Tree".One agent/capability hierarchy page for each package (
package-tree.html). To view this, go to a particular package, agent or capability page; click "Tree" to display the hierarchy for that package.An index (
index-*.html) of all agent, capabilities, beliefs, plans, goals, events and expressions names, alphabetically arranged.
Support Files.
A help page (
help-doc.html) that describes the navigation bar and the above pages. You can provide your own custom help file to override the default using-helpfile.One
index.htmlfile which creates the HTML frames for display. This is the file you load to display the front page with frames. This file itself contains no text content. Several frame files (*-frame.html) containing lists of packages, agents and capabilities, used when HTML frames are being displayed.A style sheet file (
stylesheet.css) that controls a limited amount of color, font family, font size, font style and positioning on the generated pages.A
doc-filesdirectory that holds any image, example, source code or other files that you want copied to the destination directory.
Commenting the Source Code.
You can include documentation comments in the agent description files, ahead of
declarations for any agent, capability, plan, goal, event or expression, etc.
You can also create comments for each package and another one for the overview,
though their syntax is slightly different. The comments in the agent description
files are regular xml-comments consisting of the characters between the
characters <!-- that begin the comment and the characters -->
that end it. The text in a comment can continue onto multiple lines.
<!--
    This is the typical format of a simple documentation
    comment that spans multiple lines.
-->

<!-- To save space you can also put a comment on one line. -->
Placement of comments. Documentation comments are recognized only when placed immediately before agent, capability, belief, goal, plan, event or expression declarations. Only one documentation comment per declaration statement is recognized by the Jadexdoc tool.
<!-- This is the comment for the agent 'MyAgent' -->
<agent name="MyAgent" package="jadex.examples.myagents">
    <beliefs>
        <!-- The comment for the belief 'MyBelief' -->
        <belief name="MyBelief" class="Object"/>
    </beliefs>
</agent>
Comments are written in HTML.
The texts can be written in HTML, in that they should use
HTML entities and can use HTML tags. You can
use whichever version of HTML your browser supports. The
bold HTML tag <b> is shown in the following example.
<!-- This is a <b>documentation</b> comment. -->
First sentence. The first sentence of each documentation comment should be a summary sentence, containing a concise but complete description of the declared member. This sentence ends at the first period that is followed by a blank, tab, or line terminator. The Jadexdoc tool copies this first sentence to the member summary at the top of the HTML page. For convenience, Jadexdoc strips any html tags from this sentence, when it is displayed in a summary table.
The Jadexdoc tool uses a standard doclet to determine its output. The Jadexdoc tool provides a set of command-line options that can be used with any doclet. These options are described below under the sub-heading Section 9.6.1, “Jadexdoc Options”. The standard doclet provides an additional set of command-line options that are described below under the sub-heading Options Provided by the Standard Doclet. All option names are case-insensitive, though their arguments can be case-sensitive.
-
-subpackagespck1:pck2:... Generates documentation from source files in the specified packages and recursively in their subpackages. This option is useful when adding new subpackages to the source code, as they are automatically included. Each package argument is any top-level subpackage (such as
jadex) or fully qualified package (such asjadex.examples) that does not need to contain source files. Arguments are separated by colons (on all operating systems). Wildcards are not needed or allowed.java jadex.tools.jadexdoc.Main -d docs -subpackages jadex.examples.hunterprey:jadex.examples.cleanerworld
You can use
-subpackagesin conjunction with-excludeto exclude specific packages.-
-excludepck1:pck2:... Unconditionally excludes the specified packages and their subpackages from the list formed by
-subpackages. It excludes those packages even if they would otherwise be included by some previous or later-subpackagesoption.java jadex.tools.jadexdoc.Main -d docs -subpackages jadex -exclude jadex.planlib:jadex.examples.testcases
-
-help Displays the online help, which lists these Jadexdoc and doclet command line options.
-
-quiet Shuts off non-error and non-warning messages, leaving only the warnings and errors appear, making them easier to view. Also suppresses the version string.
-
-ddirectory Specifies the destination directory where Jadexdoc saves the generated HTML files. Omitting this option causes the files to be saved to the current directory. The value directory can be absolute, or relative to the current working directory. The destination directory is automatically created when Jadexdoc is run. For example, the following generates the documentation for the package
jadex.examples.testcasesand saves the results in theuser/docdirectory: java jadex.tools.jadexdoc.Main -d user/doc jadex.examples.testcases-
-overviewpath/filename Specifies that Jadexdoc should retrieve the text for the overview documentation from the "source" file specified by
path/filenameand place it on the Overview page (overview-summary.html). While you can use any name you want for filename and place it anywhere you want for path, a typical thing to do is to name itoverview.htmland place it in the source tree at the directory that contains the topmost package directories. Note that the overview page is created only if you pass into Jadexdoc two or more package names. The title on the overview page is set by-doctitle.-
-splitindex Splits the index file into multiple files, alphabetically, one file per letter, plus a file for any index entries that start with non-alphabetical characters.
-
-windowtitletitle Specifies the title to be placed in the HTML
<title>tag. This appears in the window title and in any browser bookmarks (favorite places) that someone creates for this page. This title should not contain any HTML tags, as the browser will not properly interpret them. Any internal quotation marks within title may have to be escaped. If-windowtitleis omitted, the Jadexdoc tool uses the value of-doctitlefor this option.java jadex.tools.jadexdoc.Main -windowtitle "Jadex Examples" jadex.examples
-
-doctitletitle Specifies the title to be placed near the top of the overview summary file. The title will be placed as a centered, level-one heading directly beneath the upper navigation bar. The title may contain html tags and white space, though if it does, it must be enclosed in quotes. Any internal quotation marks within title may have to be escaped.
java jadex.tools.jadexdoc.Main -doctitle "<b>Jadex Agent Dokumentation<b>" jadex.examples.testcases
-
-headerheader Specifies the header text to be placed at the top of each output file. The header will be placed to the right of the upper navigation bar.
headermay contain HTML tags and white space, though if it does, it must be enclosed in quotes. Any internal quotation marks within header may have to be escaped.java jadex.tools.jadexdoc.Main -header "<b>Jadex Platform</b><br>0.96" jadex.examples.testcases
-
-footerfooter Specifies the footer text to be placed at the bottom of each output file. The footer will be placed to the right of the lower navigation bar.
footermay contain html tags and white space, though if it does, it must be enclosed in quotes. Any internal quotation marks within footer may have to be escaped.-
-bottomtext Specifies the text to be placed at the bottom of each output file. The text will be placed at the bottom of the page, below the lower navigation bar. The text may contain HTML tags and white space, though if it does, it must be enclosed in quotes. Any internal quotation marks within text may have to be escaped.
-
-linkextdocURL The
-linkoption enables you to link to java classes referenced to by your members in the agent description file. For these links to go to valid pages, you must know where those HTML pages are located, and specify that location with extdocURL. This allows, for instance, a jadex doc file to link to java.* documentation on http://java.sun.com. When Jadexdoc is run without the-linkoption, when it encounters a java class, it prints the fully qualified name with no link. However, when the-linkoption is used, the Jadexdoc tool searches thepackage-listfile at the specifiedextdocURLlocation for that package name. If it finds the package name, it creates a link to the external Javadoc location.extdocURLis the absolute or relative URL of the directory containing the external javadoc-generated documentation you want to link to. Examples are shown below. The package-list file must be found in this directory (otherwise, use-linkoffline). The Jadexdoc tool reads the package names from the package-list file and then links to those packages at that URL. When the Jadexdoc tool is run, theextdocURLvalue is copied literally into the <A HREF> links that are created. Therefore,extdocURLmust be the URL to the directory, not to a file. You can use an absolute link for extdocURL to enable your docs to link to a document on any website, or can use a relative link to link only to a relative location. If relative, the value you pass in should be the relative path from the destination directory (specified with-d) to the directory containing the packages being linked to. In all cases, and on all operating systems, you should use a forward slash as the separator, whether the URL is absolute or relative, and "http:" or "file:" based (as specified in theURL Memo).Absolute http: based link:
-link http://<host>/<directory>/<directory>/.../<name>Absolute file: based link:
-link file://<host>/<directory>/<directory>/.../<name>Relative link:
-link <directory>/<directory>/.../<name>You can specify multiple
-linkoptions in a given Jadexdoc run to link to multiple documents.Choosing between
-linkofflineand-link. Use-link: when using a relative path to the external API document, or when using an absolute URL to the external API document, if your shell allows a program to open a connection to that URL for reading.Use
-linkoffline: when using an absolute URL to the external API document, if your shell does not allow a program to open a connection to that URL for reading. This can occur if you are behind a firewall and the document you want to link to is on the other side.Example 9.1. Example using absolute links to the external docs
Let's say you want to link to the Java 2 Platform packages at http://java.sun.com/javase/6/docs/api/. The following command generates documentation for the package
jadex.exampleswith links to the Java 2 Platform packages.java jadex.tools.jadexdoc.Main -link http://java.sun.com/javase/6/docs/api/ -subpackages jadex.examples
Example 9.2. Example using relative links to the external docs
Let's say you have user defined java packages whose docs are generated with the Javadoc tool. Then you use the Jadexdoc tool to document the corresponding agent description files and those docs are separated by a relative path. In this example, the API (Application Programming Interface) packages reside in
docs/api/jadex/examplesand the ADF (agent description files) packages indocs/adf/jadex/examples. Assuming the API package documentation is already generated, and that docs is the current directory, you would document the ADF package with links to the API documentation by running:java jadex.tools.jadexdoc.Main -d ../adf -link ../api -subpackages jadex.examples
The
-linkargument is relative to the destination directory. In order to avoid broken links, all of the documentation for the external references must exist at the specified URLs. The Jadexdoc tool will not check that these pages exist only that the package-list exists.Multiple Links. You can supply multiple
-linkoptions to link to any number of external generated documents. Specify a different link option for each external document to link to:java jadex.tools.jadexdoc.Main -link
extdocURL1-linkextdocURL2... -subpackages jadex.exampleswhere
extdocURL1,extdocURL2, ... point respectively to the roots of external documents, each of which contains a file namedpackage-list.-
-linkofflineextdocURL packagelistLoc This option is a variation of
-link; they both create links to javadoc-generated documentation for external referenced classes. Use the-linkofflineoption when linking to a document on the web when the Javadoc tool itself is "offline" that is, it cannot access the document through a web connection.The
-linkofflineoption takes two arguments the first for the string to be embedded in the <a href> links, the second telling it where to find package-list:extdocURLis the absolute or relative URL of the directory containing the external javadoc-generated documentation you want to link to. If relative, the value should be the relative path from the destination directory (specified with-d) to the root of the packages being linked to. For more details, seeextdocURLin the-linkoption.packagelistLocis the path or URL to the directory containing the package-list file for the external documentation. This can be a URL (http: or file:) or file path, and can be absolute or relative. If relative, make it relative to the current directory from where Javadoc was run. Do not include thepackage-listfilename.
You can specify multiple
-linkofflineoptions in a given Jadexdoc run.-
-groupgroupheading packagepattern:packagepattern:... Separates packages on the overview page into whatever groups you specify, one group per table. You specify each group with a different
-groupoption. The groups appear on the page in the order specified on the command line; packages are alphabetized within a group. For a given-groupoption, the packages matching the list of packagepattern expressions appear in a table with the headinggroupheading.groupheadingcan be any text, and can include white space. This text is placed in the table heading for the group.packagepatterncan be any package name, or can be the start of any package name followed by an asterisk (*). The asterisk is a wildcard meaning "match any characters". This is the only wildcard allowed. Multiple patterns can be included in a group by separating them with colons (:).If using an asterisk in a pattern or pattern list, the pattern list must be inside quotes, such as "jadex.examples*"
If you do not supply any
-groupoption, all packages are placed in one group with the heading Packages. If the groups do not include all documented packages, any leftover packages appear in a separate group with the heading Other Packages.java jadex.tools.jadexdoc.Main -group "Core Packages" "jadex.planlib" -group "Hunterprey Packages" "jadex.examples.hunterprey*" -subpackages jadex.examples
-
-notree Omits the agent/capability hierarchy pages from the generated docs. These are the pages you reach using the "Tree" button in the navigation bar. The hierarchy is produced by default.
-
-noindex Omits the index from the generated docs. The index is produced by default.
-
-nohelp Omits the "Help" link in the navigation bars at the top and bottom of each page of output.
-
-nonavbar Prevents the generation of the navigation bar, header and footer, otherwise found at the top and bottom of the generated pages. Has no affect on the "bottom" option. The
-nonavbaroption is useful when you are interested only in the content and have no need for navigation.-
-helpfilepath/filename Specifies the path of an alternate help file
path/filenamethat the "Help" link in the top and bottom navigation bars link to. Without this option, the Jadexdoc tool automatically creates a help filehelp-doc.html. This option enables you to override this default. The filename can be any name. The Jadexdoc tool will adjust the links in the navigation bar accordingly.java jadex.tools.jadexdoc.Main -helpfile C:\user\myhelp.html -subpackages jadex.examples
-
-stylesheetfilepath/filename Specifies the path of an alternate HTML stylesheet file. Without this option, the Jadexdoc tool automatically creates a stylesheet file
stylesheet.css. This option enables you to override this default. The filename can be any name.java jadex.tools.jadexdoc.Main -stylesheetfile C:\user\mystylesheet.css -subpackages jadex.examples
-
-docfilessubdirs Enables deep copying of "doc-files" directories. In other words, subdirectories and all contents are recursively copied to the destination. For example, the directory
doc-files/example/imagesand all its contents would now be copied. There is also an option to exclude subdirectories.-
-excludedocfilessubdirname1:name2... Excludes any
doc-filessubdirectories with the given names.-
-noqualifierall | packagename1:packagename2:... Omits qualifying package name from ahead of agent/capability
andclass/interface names in output. The argument to-noqualifieris eitherall(all package qualifiers are omitted) or a colon-separated list of packages, with wildcards, to be removed as qualifiers. The package name is removed from places where agent/capability or class/interface names appear.-
-nocomment Suppress the entire comment body, including the main description, generating only declarations.
The Beanynizer is a plugin for the widely used ontology development environment Protégé and allows to generate JavaBeans and a JADE ontology file from a modelled ontology. It is very similar to the well known beangenerator plugin of JADE but offers some more flexibility regarding the generated code.
The description of the installation process assumes that you have successfully
downloaded and installed Protégé 2.1 (or later). The
installation of the plugin is simple. Extract the plugin.zip
file from the beanynizer distribution into the
protege/plugins directory. Make sure to use the “Use
folder names” option (or similar) of your zip tool, such that a
subdirectory protege/plugins/jadex.tools.beanynizer is
automatically created. (You can also create this directory by hand before unzipping. In
the end you should have a jadex_beanynizer.jar, a plugin.properties file,
and some additional jar files in this directory.) Now you can start
Protégé as usual. The → menu should contain an entry .
Selecting this entry will just take you to the Jadex homepage. For the usage of the
plugin see the next sections.
This section only discusses details of the usage of the Beanynizer plugin. For general information about creating ontologies in Protégé please consult the Protégé documentation. To create an ontology for use with Jadex, follow these four steps:
Create a new ontology e.g. with the → menu item. Note that Beanynizer currently does not support OWL, so you have to choose a standard or RDF ontology format. Save the new ontology to a directory of your choice.
Include one of the Beanynizer default ontologies. The beanynizer supports the creation of ontologies for use with the JADE platform (
beanynizer_default.pprj), or pure Java ontologies for use with the Jadex Java-XML encoding (beanynizer_beans_default.pprjorbeanynizer_beans_fipa_default.pprjif you want to refer to FIPA related concepts). E.g., Use the → menu and select thebeanynizer_beans_fipa_default.pprjfile in the appearing file chooser. Protégé will store the location of the default ontology using an absolute path. As this is undesirable most of the time, you should copy the Beanynizer default files (.pprj,.pins,.pont) to the directory of your ontology, and include the ontology from there. In this case Protégé will use a relative path name.Add classes and slots to your ontology. The JADE default ontology provides four base classes (
Concept,AgentAction,agent-identifier,Predicate) that you should use as superclasses for your own concepts. If you don't know the meaning of thesebase classes consult the JADE ontology guide. For a pure Java ontology, classes can be directly created as subclasses of Protégé's :THING class. In any case, you may also find it helpful to take a look at the ontologies used in the Jadex examples.Generate Java sources from the ontology using the Beanynizer tab. If you created your ontology from scratch, you will have to activate the tab first. Select the → menu and open the "Tab Widgets" tab (see Figure 10.1, “Protégé plugin configuration”). Activate the Beanynizer tab and close the dialog by hitting . In the "Beanynizer Tab" you can now edit the code generation options such as packagename and output directory (see Figure 10.2, “Jadex Beanynizer tab”). Depending on the base ontology you used, you also have to select the correct "Generation Mode" ("Java" for a pure beans ontology, "Jade" for a JADE ontology). Pressing the button will create the desired source files. See the Jadex user guide, for an introduction how to use the generated ontology in your Jadex agents. The next sections discuss how you can influence the code generation process.
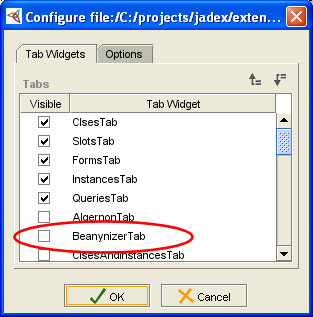
The general options for the ontology are available from the code generation panel (see
Figure 10.2, “Jadex Beanynizer tab”). The ontology name is the
name, that will appear in the "ontology" slot of an ACL messages.
From Java this is available with the
ontologyclass.ONTOLOGY_NAME
constant. A package can be specified, where the ontology class file should be generated.
This package is also the default for other generated classes. The class name is the
Javaclass name to be used for the ontology (without package). The output directory is
the root directory for the package hierarchy to be generated. You can use relative paths
here, which will be expanded relative to the saving-location of the
Protégé project. When subdirectories for some packages do not
exist, they will be created on-the-fly.
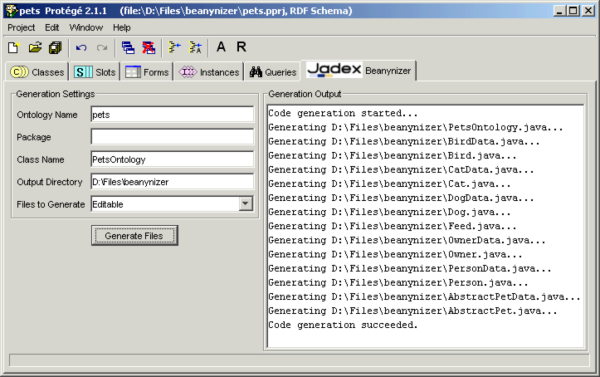
The "Files to Generate" option specifies which kind of Java files should be generated for your ontology classes. Note that this option only represents a default, that can be overridden individually for each ontology class as described in the next section.
- External
means that the ontology uses Java classes that already exist and do not have to be generated. In this case, only the single ontology class file will be generated.
- Editable
(which is the default) creates two files for any ontologyclass: A
classnameData.javaclassname.java- Fixed
option only creates one file for each ontology class. This file should not be edited, because changes are lost, when regenerating code.
The Protégé classes panel is extended with extra options concerning the code generation. These extra options are shown below the template slots list (see Figure 10.3, “Protégé classes panel”, bottom right). As default, the Protégé name of the class is used for the .java file. This can be overridden by specifying an additional Java class name. The interface flag can be set, when not a class but an interface should be generated. In general, this only makes sense for abstract ontology classes.
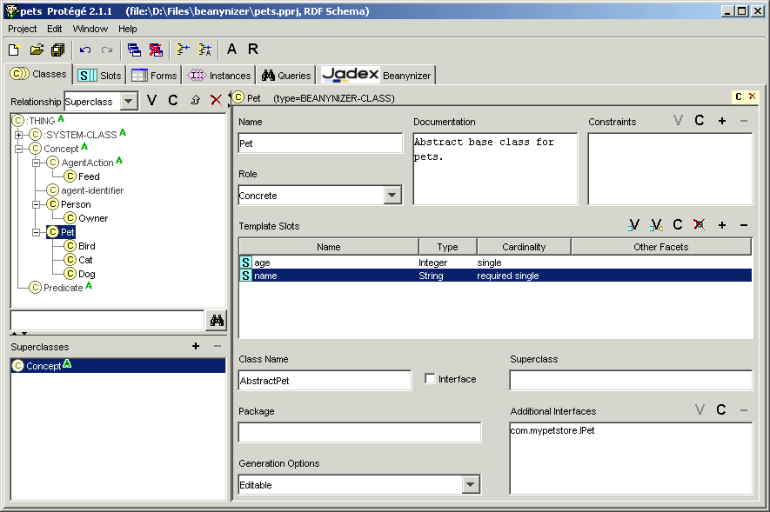
The package field allows to specify the package of the Java class, overriding the
default package specified in the code generation tab. The "Generation
Options" offer the same options as the "Files to Genrate",
and influence how many files are generated for each ontology class. E.g., setting the
option to "Fixed" allows to include an already existing class in the
ontology. In addition, the field can be left blank to indicate that the ontology default
should be used. The superclass field and the additional interfaces list, allow to
specify fully qualified class or interface names to use as superclass or additionally
implemented interfaces. If no superclass is given, the code generator creates a class
hierarchy corresponding to the hierarchy in the ontology. For interfaces, only
implements is added to the
class, the generator does not (yet) magically fill in any missing method
implementations.interface, . . .
The code generator generates fields and getter / setter methods for each slot, thereby respecting settings such as name, type, default value, and cardinality (see Figure 10.4, “Protégé Slot Options”). For slots that allow multiple values, also add / remove methods are generated. Supported slot types and their default Java mappings are:
Table 10.1. Slot to Java type mappings
| Slot Type | Java Type |
|---|---|
| Any | n/a |
| Boolean |
boolean
|
| Class | n/a |
| Float |
double
|
| Instance | a java class |
| Integer |
int
|
| String |
java.lang.String
|
| Symbol |
java.lang.String
|
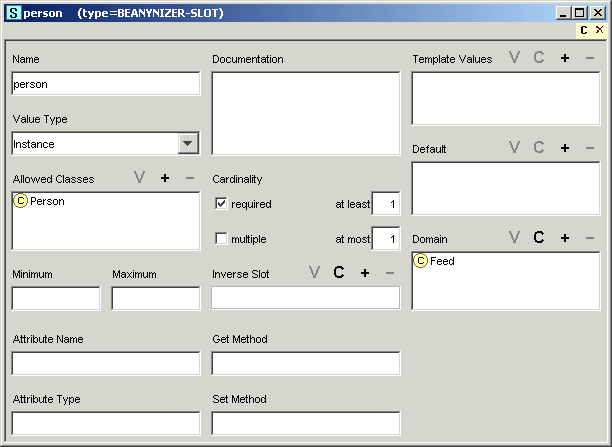
The name to use for the generated field can be specified using the attribute name
option. The Beanynizer has its own idea of Java coding conventions and tries to create a
suitable Java name from the slot name, when no specific attribute name is given. The
attribute type allows to change the generated Java type, by specifying a fully qualified
class name, or one of the basic types (e.g. long). The names of getter and setter
methods are derived from the attribute name (which may also be derived from the slot
name). Use the get method and set method options to change the names of the methods to
generate. This is especially helpful, when including already existing classes in the
ontology.
The pure Java ontology supports two other settings for slots: "transient" and "external".
For transient slots, the field is generated with the transient keyword.
External slots are ignored during code generation (this is useful, if the ontology class extends an
existing Java class, which already provides the get/set methods for a given slot).
It is possible (while maybe a bit awkward) to convert other ontologies to be used with the Beanynizer. To convert an existing ontology perform the following steps (note, this process has only been tested with Protégé 2.1 and might not work with 3.0):
Load the old ontology and save it under a new name (to keep the original file untouched).
Use the → option to remove references to other external ontologies.
Include the Beanynizer default ontology as described above. If your original ontology was also designed for use with a FIPA-compliant agent platform, ignore any errors, e.g., complaining about duplicate definition of classes like
AgentAction, etc.If your original ontology did contain FIPA classes with different names (e.g.,
AIDfor agent identifiers) change all references to these classes (if any) to now refer to the Beanynizer classes (e.g.,agent-identifier). Afterwards remove the original FIPA classes.When your original ontology was not designed to be used with FIPA, you might have to rearrange the class hierarchy, such that all your classes are derived from the appropriate classes (such as AgentAction).
Now the awkward part: Make sure that all your classes and slots are instances of the Beanynizer metaclasses. The required metaclass is called
BEANYNIZER-CLASSand is a subclass of the:STANDARD-CLASS. You change the metaclass by selecting each single class and using the option from the popup menu, but a much faster way is to change to the instance tab, and use drag and drop. The same procedure should be done for your slots, which should be instances of theBEANYNIZER-SLOT. Finally, you should make the Beanynizer class and the Beanynizer slot the default metaclasses by using the option from the popup menu.You're done! You can now start to generate code, or to adjust code generation options as described above.
Protégé is a complex tool in itself, therefore a basic understanding of it is essential before you can effectively use the Beanynizer plugin. The Beanynizer is still an early staged development based on our specific requirements, and does not try to be a general purpose code generation environment. If you encounter problems or miss some features please drop us a note, such that we can improve the Beanynizer for upcoming releases.
Usages of the Beanynizer can be found in the cleanerworld, marsworld and hunterprey
examples (look for an "ontology" package). Also, some Jadex tools use a Beanynizer
generated ontology for communication (e.g., introspector, and tracer). Their
Protégé ontology files can be found in the
jadex/onto directory.
The Beanynizer was designed for flexible code generation. The code for the Java
classes is based on templates processed with the Velocity template engine. The
templates for the Java and Jade generation modes can be found in the src/jadex/tools/beanynizer/genjava and
src/jadex/tools/beanynizer/genjade directories.
If you want to change the way Beanynizer generates code, you may try to alter these
templates to suit your needs. See http://jakarta.apache.org/velocity/ for more information about the Velocity
template language.
 The Jadex reasoning engine can be used in combination with the well-known
open source agent platform JADE (see JADE project page).
When the JADE adapter is used in combination
with Jadex the JCC offers besides the general Jadex tools the JADE RMA plugin.
The Remote Monitoring Agent (RMA) of JADE is a system agent that offers several
management possiblities. It contains besides other things a Sniffer tool for
observing conversations between agents and an introspector tool for debugging
JADE agents. The JADE RMA plugin make the RMA user interface available from
within the JCC. When the RMA plugin is activated a JADE RMA agent ist started
and its user interface is shown in the plugin view.
Below a screenshot of the RMA plugin is shown:
The Jadex reasoning engine can be used in combination with the well-known
open source agent platform JADE (see JADE project page).
When the JADE adapter is used in combination
with Jadex the JCC offers besides the general Jadex tools the JADE RMA plugin.
The Remote Monitoring Agent (RMA) of JADE is a system agent that offers several
management possiblities. It contains besides other things a Sniffer tool for
observing conversations between agents and an introspector tool for debugging
JADE agents. The JADE RMA plugin make the RMA user interface available from
within the JCC. When the RMA plugin is activated a JADE RMA agent ist started
and its user interface is shown in the plugin view.
Below a screenshot of the RMA plugin is shown:
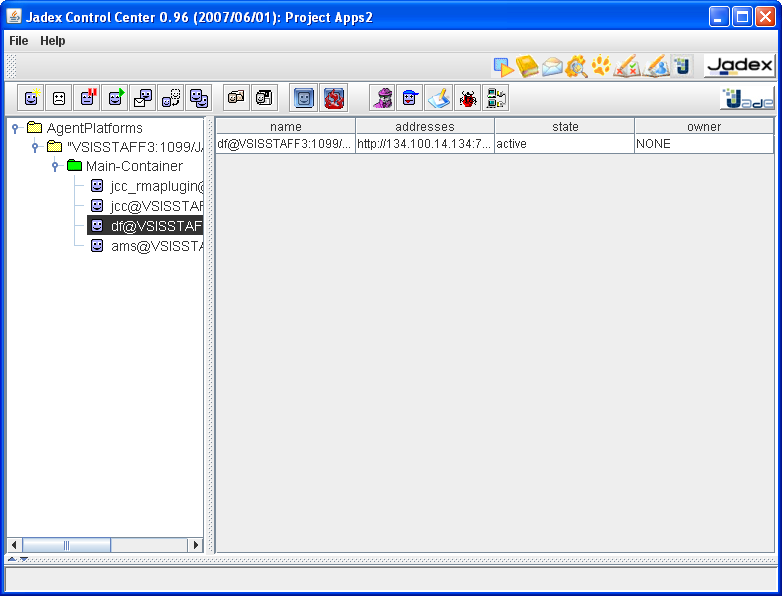
Basically the RMA view consists of three different areas. On top the JADE tool bar offers a quick access to many of the JADE actions such as agent staring, stopping and launching tool agents. Below the tool bar on the left hand side the agent tree table shows the platforms, containers and the currently alive agents. Clicking on an agent causes the details of its state being displayed in the content panel at the right. Detailed information about the RMA and its associated tools can be found in the (see JADE RMA documentation).
[Bauer et al. 2001] Agent UML: A Formalism for Specifying Multiagent Interaction. Proceedings of the First International Workshop on Agent-Oriented Software Engineering (AOSE 2000). Springer. Berlin, New York. 2001. pp.91-103.
[Bellifemine et al. 2007] Developing Multi-Agent Systems with JADE. John Wiley & Sons. New York, USA. 2007.
[Bratman 1987] Intention, Plans, and Practical Reason. Harvard University Press. Cambridge, MA, USA. 1987.
[Braubach et al. 2004] Goal Representation for BDI Agent Systems. Proceedings of the Second Workshop on Programming Multiagent Systems: Languages, frameworks, techniques, and tools (ProMAS04). Springer. Berlin, New York. 2004. pp.9-20.
[Braubach et al. 2005a] Jadex: A BDI Agent System Combining Middleware and Reasoning. Software Agent-Based Applications, Platforms and Development Kits. Birkhäuser. 2005. pp.143-168.
[Braubach et al. 2005b] Extending the Capability Concept for Flexible BDI Agent Modularization. Proceedings of the Third International Workshop on Programming Multi-Agent Systems (ProMAS'05). . 2005. pp.99-114.
[Busetta et al. 2000] Structuring BDI Agents in Functional Clusters. Intelligent Agents VI, Proceedings of the 6th International Workshop, Agent Theories, Architectures, and Languages (ATAL) '99. Springer. Berlin, New York. 2000. pp.277-289.
[Hindriks et al. 1999] Agent Programming in 3APL. Autonomous Agents and Multi-Agent Systems. Kluwer Academic publishers. 1999. pp. 357-401.
[Huber 1999] JAM: A BDI-Theoretic Mobile Agent Architecture. Proceedings of the Third Annual Conference on Autonomous Agents (AGENTS-99). ACM Press. New York. 1999. pp. 236-243.
[Lehman et al. 1996] A gentle introduction to Soar, an architecture for human cognition. Invitation to Cognitive Science Vol. 4. MIT press. 1996.
[McCarthy et al. 1979] Ascribing mental qualities to machine. Philosophical Perspectives in Artificial Intelligence. Humanities Press. Atlantic Highlands, NJ. 1979. pp. 161-195.
[Pokahr et al. 2005a] A Goal Deliberation Strategy for BDI Agent Systems. In Proceedings of the third German conference on Multi-Agent System TEchnologieS (MATES-2005). Springer-Verlag. Berlin Heidelberg New York. 2005.
[Pokahr et al. 2005b] A Flexible BDI Architecture Supporting Extensibility. Proceedings of The 2005 IEEE/WIC/ACM International Conference on Intelligent Agent Technology (IAT-2005). IEEE Computer Society. 2005. pp. 379-385.
[Pokahr et al. 2005c] Jadex: A BDI Reasoning Engine. Programing Multi-Agent Systems. Kluwer Academic Publishers. 2005. pp.149-174.
[Rao and Georgeff 1995] BDI Agents: from theory to practice. Proceedings of the First International Conference on Multi-Agent Systems (ICMAS'95). The MIT Press. Cambridge, MA, USA. 1995. pp.312-319.